Difference between revisions of "Documentation/OOo3 User Guides/Writer Guide/Problem solving"
Clairedwood (Talk | contribs) (→Including landscape pages in a portrait-oriented master document) |
Clairedwood (Talk | contribs) (→Including landscape pages in a portrait-oriented master document) |
||
| Line 53: | Line 53: | ||
# Remove the landscape pages from the subdocument and put them in a separate document. Note that if the landscape pages are in the middle of the original subdocument, you will end up with at least three documents: (a) the portion of the subdocument before the landscape pages, (b) the landscape pages themselves, and (c) the portion of the subdocument after the landscape pages. | # Remove the landscape pages from the subdocument and put them in a separate document. Note that if the landscape pages are in the middle of the original subdocument, you will end up with at least three documents: (a) the portion of the subdocument before the landscape pages, (b) the landscape pages themselves, and (c) the portion of the subdocument after the landscape pages. | ||
# Insert documents (a), (b) and (c) individually into the master document. | # Insert documents (a), (b) and (c) individually into the master document. | ||
| − | # Use the method described | + | # Use the method described in [[Documentation/OOo3_User_Guides/Writer_Guide/Recommended_method#Step 4. Insert some information directly into the master document|Recommended method for creating a master document]] to include a manual page break in a text section before and after the landscape document. |
| − | + | ||
| − | + | ||
| − | + | ||
| + | If you want portrait headers and footers on the landscape pages, use the technique described in [[Documentation/OOo3_User_Guides/Writer_Guide/Formatting_Pages|Chapter 4 (Formatting Pages)]]. | ||
== Anchoring pictures to a page == | == Anchoring pictures to a page == | ||
Revision as of 14:48, 5 June 2010
Some combinations of choices do not work together. This section describes some problems and what to do about them.
Including a chapter reference in the header of the first page
The problem
If you use the method described in Step 5. Insert the subdocuments into the master document (putting a page break paragraph into the master document between the subdocuments), and you put a cross-reference to the chapter name and number in the header of the first page of each chapter, then the cross-reference field on the first page will pick up the chapter name and number from the previous chapter. This happens because with this method the first (blank) paragraph on those pages is actually the last paragraph of the previous chapter. The example did not include a cross-reference to the chapter name and number in the header of the first page, so it did not have this problem.
First page footers do not have this problem; they correctly pick up the current chapter’s name and number.
The solution
The cure for this problem is as follows:
- Use File > Templates > Edit to open the template used for the master document and its subdocuments.
- Modify the style for the chapter title (usually Heading 1) to enable a page break before, using the page style you want for the first page of each chapter. Save and close the template.
- When you reopen the master document, it should ask two questions: “Update all links?” and “Your styles don’t match the template. Do you want to update your files?” Be sure to answer Yes to both questions.
- Modify the chapter title style (Heading 1) in the master document file as you did in the template file in step 2. Save the master document.
- Open the Navigator in Master Document view and delete the Text sections between the chapters. Update all links.
The headers on the first page of each chapter will now display the correct chapter name and number.
The problem with the solution—and a workaround
This solution creates another problem, if you want to restart page numbering at 1 on the first page of the first chapter and have pages numbered sequentially through all the chapters.
Normally you would restart numbering by specifying the starting page number when you modify the Heading 1 style to start on a new page. However, if you do that, then each chapter restarts page numbering at 1. (Sometimes this is what you want, but often it is not.)
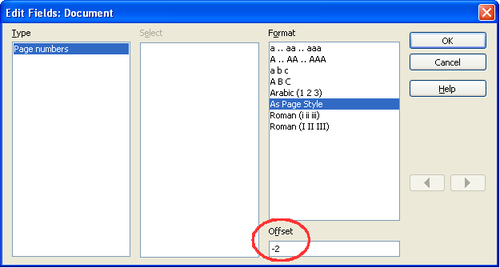
In this case, you will have to include an “offset” in the page number field—that is, you tell Writer how many pages to subtract to make the first page of the first chapter to be page number 1. Of course, to make this work, you need to know how many pages are in the front matter, and you may not know that until after you have finished the entire book. If you add or delete some pages (for example, if the table of contents grows from 4 pages to 5), you will need to adjust the offset accordingly. Therefore, this adjustment is best made at the end of the project.
Here is how to do it.
- In the master document itself—not in the subdocument—place the cursor just in front of the Page field on the first page of the first chapter. Right-click and choose Fields from the pop-up menu.
- In the Edit Fields dialog box, type a negative even number (–2, –4, etc.) in the Offset box. Click OK to save this change.
- You might need to make the same change on the second page of the first chapter.
Including landscape pages in a portrait-oriented master document
The problem
Master documents ignore manual page breaks in subdocuments if the manual break specifies the following page style. Landscape pages are inserted into portrait-oriented documents by inserting a manual page and specifying a landscape page style (and then changing back to portrait orientation by inserting another manual break and specifying the following page style). This technique works fine until the document becomes a subdocument within a master document. At that point the landscape pages become portrait pages and the page break itself is ignored.
The solution
- Remove the landscape pages from the subdocument and put them in a separate document. Note that if the landscape pages are in the middle of the original subdocument, you will end up with at least three documents: (a) the portion of the subdocument before the landscape pages, (b) the landscape pages themselves, and (c) the portion of the subdocument after the landscape pages.
- Insert documents (a), (b) and (c) individually into the master document.
- Use the method described in Recommended method for creating a master document to include a manual page break in a text section before and after the landscape document.
If you want portrait headers and footers on the landscape pages, use the technique described in Chapter 4 (Formatting Pages).
Anchoring pictures to a page
The problem
A picture (graphic) anchored “to page” in a subdocument is not displayed in the master document although it always appears correctly in the subdocument.
Because the master document reorganizes the page flow, page numbers, and cross-references when it collates all the subdocuments together, the absolute reference to a page X in a subdocument is lost in the master document. The picture loses its anchor reference and simply disappears.
The solution
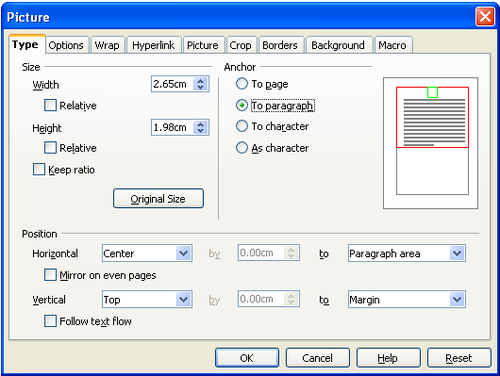
To avoid this problem but keep pictures positioned precisely on a particular page, anchor the pictures as follows:
- Right-click on the picture and choose Picture from the pop-up menu.
- On the Type tab of the Picture dialog box, set the anchor to To character or To paragraph.
- Under Position, choose suitable horizontal and vertical references to the page.
| Content on this page is licensed under the Creative Common Attribution 3.0 license (CC-BY). |

