Difference between revisions of "Documentation/OOo3 User Guides/Writer Guide/Customizing appearance of index"
Clairedwood (Talk | contribs) m (→Styles and Background pages) |
Clairedwood (Talk | contribs) m (→Styles and Background pages) |
||
| Line 99: | Line 99: | ||
== Styles and Background pages == | == Styles and Background pages == | ||
| − | Refer to the [[Documentation/OOo3_User_Guides/Writer Guide/Styles, Columns, and Background#Using the Styles page#Using the Styles Page|Styles]] and [[Documentation/OOo3_User_Guides/Writer Guide/Styles, Columns, and Background#Using the Background page|Background]] pages. | + | Refer to the [[Documentation/OOo3_User_Guides/Writer Guide/Styles, Columns, and Background#Using the Styles page#Using the Styles Page|Styles]], [[Documentation/OOo3_User_Guides/Writer Guide/Styles, Columns, and Background#Columns Page|Columns]] and [[Documentation/OOo3_User_Guides/Writer Guide/Styles, Columns, and Background#Using the Background page|Background]] pages. |
{{CCBY}} | {{CCBY}} | ||
[[Category: Writer Guide (Documentation)]] | [[Category: Writer Guide (Documentation)]] | ||
Revision as of 16:48, 4 June 2010
- Tables of contents
- Customizing a table of contents
- Using the Index/Table page
- Using the Entries page
- Using the Styles, Columns, and Background pages
- Maintaining a table of contents
- Alphabetic indexes
- Customizing index entries
- Customizing the appearance of an index
- Maintaining an index
- Other types of indexes
- Bibliographies
- Creating a bibliographic database
- Adding a reference (citation) into a document
- Formatting the bibliography
- Defining the paragraph style for the bibliography
- Updating and editing an existing bibliography
The Insert Index/Table dialog box has five pages. Any or all of them can be used to customize the appearance of an index.
- Use the Index/Table page to set the attributes of the TOC, most importantly the type of index.
- Use the Entries and Styles pages to format the entries in the TOC.
- Use the Columns page to put the TOC into more than one column.
- Use the Background page to add color or a graphic to the background of the TOC.
The preview box, located on the right-hand side of the dialog box, shows as you work how the index will look. (If you do not see the preview box, select the Preview checkbox in the lower right-hand corner of the dialog box.)
After making your changes, click OK to save the index so it appears in your document.
Using the Index/Table page
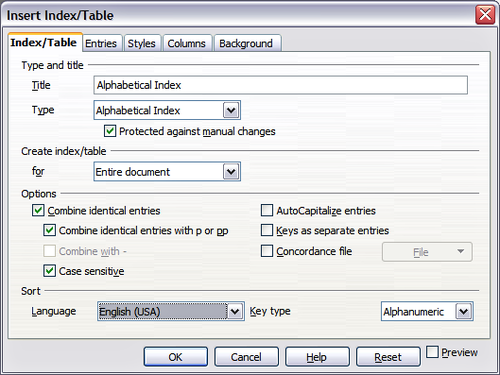
Use the Index/Table page to set the basic attributes of the index.
- To give the Index a title, type it in the Title field. (You can change an existing title by typing over it.) To delete the title, clear the Title field.
- Be sure the Type of Index is set to Alphabetic Index.
- To prevent the index from being changed accidentally, select Protected against manual changes. If this option is selected, the index can only be changed using the right-click menu or the Insert Table/Index dialog box. If the option is not selected, the index can be changed directly on the document page, just like other text, but any manual changes to an index are lost when you update it.
- From the drop-down list in the Create index/table area, select Entire document. You can also choose to create an index for just the current chapter.
- Various other options determine how the index handles entries:
- Combine identical entries. Defines how identical entries are dealt with. Normally each page number of an indexed word or phrase will be shown in the index; however these can be combined using the Combine identical entries with p or pp. If you want a page range displayed, select Combine with – (which will produce something similar to 23–31). If you want different entries based on what letters are capitalized, select Case sensitive.
- AutoCapitalize entries. Automatically capitalizes the first letter of each entry regardless of how they show within the document itself.
- Keys as separate entries. For the keys to have their own page numbers, select this option.
- Concordance file. Enables a list of words in an external file to be imported (select using the File button) and then used within the index. The concordance file has a special file format; for further information, refer to concordance file in Help > OpenOffice.org Help. Using a concordance file can speed up production of an index, but unless the words are very carefully selected and you edit the index afterwards, the resulting index can be full of entries for minor mentions of a term, making it less useful than a more selective index.
- Sort. Defines how the entries are sorted when displayed. The only option is alphanumeric, but you can define which language alphabet will be used.
Using the Entries page
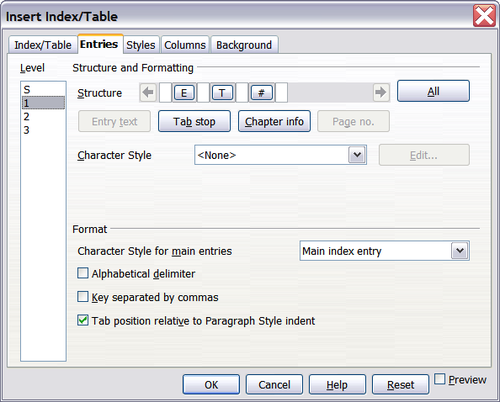
Use the Entries page to set exactly how and what will be displayed for each of the entries. The dialog box is similar to the figure below.
To begin, click a number in the Level column to select the index level whose elements you want to format. (You will be able to apply your changes to all index levels later.) The Structure line displays the elements for entries in that level. Each button on the Structure line represents one element:
- The E button represents the entry text.
- The T button represents a tab stop.
- The # button represents the page number.
- The CI button represents chapter information. This may not be displayed immediately, but can be added.
Each white field on the Structure line represents a blank space. You can add custom text if you desire.
Adding Elements
To add an element to the Structure line:
- Place the cursor in the white field to the left of where you want to insert the element.
- Click one of the buttons below the Structure line. (For example, to add a tab stop, click the Tab stop button.) A button representing the new element appears on the Structure line.
Changing elements
To change an element in the Structure line, click the button representing that element and then click the element that you want to substitute in the row of buttons just below the Structure line. For example, to change entry text to a tab stop, click the E# button on the Structure line (it shows then as being pressed) and then click the Tab stop button in the row of available elements.
Deleting elements
To delete an element from the Structure line, click the button that represents that element and then press the Delete key on your keyboard. For example, to delete a tab stop, click the T button and then press the Delete key.
Applying character styles
Each of the items that can be added to the Structure line may have additional formatting. For example, you may want the page number to be a different size from the rest of the index text. To do this, apply a character style to one of the elements in the Structure line.
To apply a character style to an element:
- On the Structure line, click the button representing the element to which you want to apply a style.
- Select the desired style from the Character Style drop-down list. Writer applies the style to the selected element.
To view or edit the attributes of a character style, select the style from the Character Style drop-down list and then click the Edit button.
Formatting entries
Apply additional formatting using the options in the Format section.
- Alphabetical delimiter. This separates the index entries into blocks that start with the same first letter, using that letter as a header. For example,if your index begins:
apple, 4 author, 10 break, 2 bus, 4
then selecting this option will give you:
- A
- apple, 4
- author, 10
- B
- break, 2
- bus, 4
- Key separated by commas. Arranges the entries in the index on the same line but separated by commas.
- Tab position relative to Paragraph Style indent. When checked, entries are indented according to the settings of their individual formats. Where a paragraph style with an indent on the left is in use, tab stops will be relative to this indent. If this checkbox is not selected, tab stops will be relative to the left margin position.
Styles and Background pages
Refer to the Styles, Columns and Background pages.
| Content on this page is licensed under the Creative Common Attribution 3.0 license (CC-BY). |

