Difference between revisions of "Documentation/OOo3 User Guides/Writer Guide/Creating one file from a master document"
From Apache OpenOffice Wiki
m |
|||
| (One intermediate revision by one other user not shown) | |||
| Line 1: | Line 1: | ||
| − | {{DISPLAYTITLE:Creating one file from a master document and its subdocuments | + | {{DISPLAYTITLE:Creating one file from a master document and its subdocuments}} |
{{Documentation/WG3MasterDocsTOC | {{Documentation/WG3MasterDocsTOC | ||
|ShowPrevNext=block | |ShowPrevNext=block | ||
| Line 18: | Line 18: | ||
<li>Choose '''Edit > Links''' from the menu bar.</li> | <li>Choose '''Edit > Links''' from the menu bar.</li> | ||
| − | {{ | + | {{Tip| If the '''Links''' command is greyed-out, the cursor is probably in a write-protected part of the document (for example, in one of the linked documents). Move the cursor into a part of the document that is not write-protected; the '''Links''' command then becomes available.}} |
<li>The Edit Links dialog shows all the linked files. Select all the files in the ''Source file'' list and click '''Break Link'''. This step embeds (includes) the contents of all the subdocuments into one single file (but with each subdocument remaining in a separate section) and removes the write protection on the sections.</li> | <li>The Edit Links dialog shows all the linked files. Select all the files in the ''Source file'' list and click '''Break Link'''. This step embeds (includes) the contents of all the subdocuments into one single file (but with each subdocument remaining in a separate section) and removes the write protection on the sections.</li> | ||
| Line 27: | Line 27: | ||
</ol> | </ol> | ||
| − | {{ | + | {{Tip| The Help does not mention steps 4 and 5 above, giving only the step for removing the sections. If you have no hidden sections, that technique works fine and is faster; however, if you want to break the links but retain some or all of the sections (particularly hidden sections), then the method described in this chapter is safer.}} |
{{CCBY}} | {{CCBY}} | ||
[[Category: Writer Guide (Documentation)]] | [[Category: Writer Guide (Documentation)]] | ||
Latest revision as of 20:36, 15 July 2018
- Styles and master documents
- Using the Navigator
- Creating a master document
- Recommended method for creating master documents
- Editing a master document
- Cross-referencing between subdocuments
- Creating one file from a master document and its subdocuments
- Problem solving
Master documents are .odm files containing linked subdocuments, which are in .odt format. Although linked files are very useful when writing and editing a large document such as a book, sometimes you might need to have a copy of the entire book in one file.
To export a master document to a .odt file (without affecting the original .odm file), do this:
- Open the master document. Choose File > Export from the menu bar.
- On the Export dialog, type a name for the exported .odt file and choose OpenDocument Text (.odt) from the File format list. Click Export. This step changes the .odm file into a .odt file, with each subdocument in a separate section.
- Close the master document and open the new .odt file, updating all links.
- Choose Edit > Links from the menu bar.
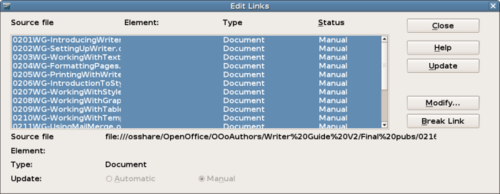
- The Edit Links dialog shows all the linked files. Select all the files in the Source file list and click Break Link. This step embeds (includes) the contents of all the subdocuments into one single file (but with each subdocument remaining in a separate section) and removes the write protection on the sections.
- After breaking the links, you may wish to also remove some or all of the sections. To do that, go to Format > Sections, select the sections you wish to remove, and click Remove. The contents of those sections remain in the document; only the section markers are removed.
| Content on this page is licensed under the Creative Common Attribution 3.0 license (CC-BY). |

