Difference between revisions of "Documentation/OOo3 User Guides/Writer Guide/Create form letter"
Clairedwood (Talk | contribs) m |
Clairedwood (Talk | contribs) m |
||
| Line 20: | Line 20: | ||
[[Image:CH11_SelectDataSource.png|thumb|none|500px|''Selecting the data source.'']] | [[Image:CH11_SelectDataSource.png|thumb|none|500px|''Selecting the data source.'']] | ||
| − | <li>Now create or modify the form letter by typing in text, punctuation, line breaks, and so on that will be present in all of the letters | + | <li>Now create or modify the form letter by typing in the text, punctuation, line breaks, and so on that will be present in all of the letters. To add the mail-merge fields where needed (such as names and addresses), click in the field heading and drag it to the appropriate point in the letter. (See Figure below). |
| − | Note | + | {{Documentation/Note| The address lines should be in individual paragraphs, not separated by line breaks as might seem preferable. The reason for this will be made clear in the next step.}} |
[[Image:WG11-10.png|thumb|none|500px|''Dragging fields to the body of the form letter'']] | [[Image:WG11-10.png|thumb|none|500px|''Dragging fields to the body of the form letter'']] | ||
Revision as of 10:11, 4 June 2010
Example: Sending a letter to your customer base
A mail order company organized a campaign to assign credit points to their customers according to the quantity of goods they buy during one year.
At the end of the year, they want to send a letter to each customer to show the total of credit points collected.
You can create a form letter manually, which is the simplest and most comprehensive method and is described here, or you can use the Mail Merge wizard as described in Using the Mail Merge Wizard to create a form letter. If you elect to use the wizard, pay close attention to its current limitations, as identified within its description.
- Create a new text document: File > New > Text Document, or open a pre-existing form letter with File > Open.
- Display the registered data sources: View > Data sources (or press F4).
- Find the data source that you wish to use for the form letter, in this case Points. Expand the Points and Tables folders, and select Sheet1. The address data file is displayed.
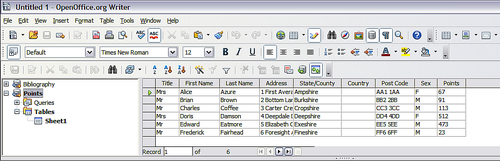 Selecting the data source.
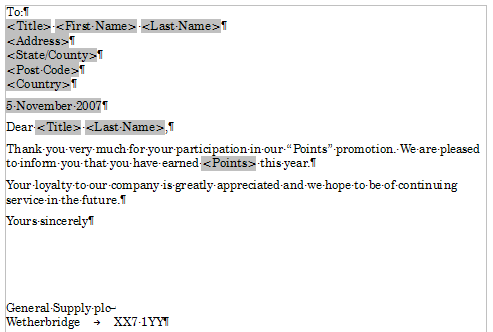
- Now create or modify the form letter by typing in the text, punctuation, line breaks, and so on that will be present in all of the letters. To add the mail-merge fields where needed (such as names and addresses), click in the field heading and drag it to the appropriate point in the letter. (See Figure below).
Template:Documentation/Note
 Dragging fields to the body of the form letter
 - Continue until you have composed the entire document. (See below for an example.) At this time you may wish to consider suppressing any blank lines that may appear in the resulting letters. If not, skip ahead to Step 7.
 The completed form letter.
 - To suppress blank lines:
- Click at the end of the first paragraph to be suppressed and then select Insert > Fields > Other.
- Select the Functions tab and then click on Hidden Paragraph in the Type column.
- Now click in the Condition box and enter the details of the condition that defines a blank address field. It has the general form of:
- Click Insert, but do not close the dialog until you have amended all the lines that should be suppressed.
![Database.Table.Database field]
where the ‘!’ (NOT) character indicates the negative case and the square brackets indicate the condition.
For example, in our Points database the condition to test if the Company field is empty would be:
![Points.Sheet1.Company] as illustrated below.
 Hidden paragraph insertion.
To test for multiple conditions use the operators AND and/or OR between the conditional statements, for example:
![Points.Sheet1.Title]AND![Points.Sheet1.Last Name]
- The document is now ready to be printed. Click File > Print and respond with Yes in the message box.
- In the Mail Merge dialog, you can choose to print all records or selected records. To select records to be printed, use Ctrl+click to select individual records. To select a block of records, select the first record in the block, scroll to the last record in the block, and Shift+click on the last record.
- Click OK to send the letters directly to the printer.
- If you have not saved the original, prototype form letter document (template) previously, then you should do so now. Having a form letter template could greatly simplify the creation of other form letters in the future and is highly recommended.


If you prefer to save the letters to a file, perhaps to allow proofreading or some later formatting, select File in the output section of the Mail Merge dialog, instead of using the default Printer selection. This changes the dialog to display the Save merged document section, where Save as single document is pre-selected. You can choose to save each letter as a single, individual document, if preferred.
In this case, clicking OK brings up the Save as dialog. Enter a file name for the saved letters. They will be saved consecutively in the single document, or numbered consecutively in individual files if saved as single documents.
| Content on this page is licensed under the Creative Common Attribution 3.0 license (CC-BY). |