Using slide transitions
Slide transitions are the effects that take place when one slide gives way to the next one in the presentation, like Roll down from top or Fly in from left. They add dynamic flair to a slideshow, smoothing the transition between slides.
You can add transitions while in Slide Sorter view or in Normal view. To see the effect of a selection, you need to be in Normal view and select the Automatic preview checkbox on the Slide Transition page of the Tasks pane.
You can apply a single type of transition to all slides in the presentation or apply a different transition to any single slide, even having a different transition for every slide in the show. While using many different transitions may be fun to do, it may not give your show a professional appearance.
Contents
Setting the timing of automatic slide changes
You can set up a slide show to run automatically, either unattended or while you speak. To set the default time for slides to be displayed before changing to the next slide, go to the Slide Transition pane, leave the transition effect set to No Transition, choose Automatically after in the Advance slide section, set a time, and click the Apply to All Slides button.
To vary the times for some slides, choose Slide Show > Rehearse Timings from the menu bar, or click the Rehearse Timings icon on the Slide Show toolbar. The slide show begins in full-screen mode, and a timer appears in the lower left-hand corner of the screen.
When you want to advance to the next slide, click the timer. To keep the default setting for this slide, click the slide, not the timer. Continue for all slides in your presentation. Impress records the display time for each slide. Save your presentation. When you next look at the time set under Automatically after, you will see that the times have changed to match what you set when rehearsing.
If you want the whole presentation to auto-repeat, open the menu Slide Show > Slide Show Settings. Click Auto and OK.
Applying a slide transition effect
In the Tasks pane, choose Slide Transition.
In the Slides pane or Slide Sorter view, select the slides to which you want to apply the transition. If you want the transition to apply to all slides, you do not need to select them first.
In the Apply to selected slides list, select a transition.
Modify the selected transition by changing the speed or adding a sound, in the Modify transition area.
If you choose to play a sound, select it in the Sound list. The Loop until next sound checkbox now becomes active. Select this checkbox to play the sound repeatedly until another sound starts.
Choose how to advance to the next slide: manually (on mouse click) or automatically. If you choose automatically, you can specify how long the slide remains visible before it automatically advances to the next slide.
If you want the effect you just defined to apply to all slides in the show, click the Apply to All Slides button.
To preview the transition effect, click the Play button.
To start the slide show from the current slide (so you can see all the transitions), click the Slide Show button.
-
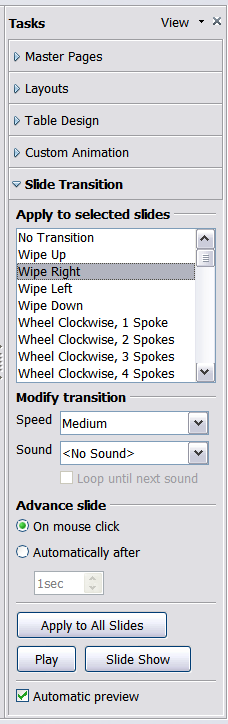
Task pane, showing Slide Transition page.

Playing a sound throughout the presentation
You can use the Slide Transition pane to set up Impress so that a sound or a song is played throughout the presentation. To do that:
- Select the slide where you want the sound to start and go to the Slide Transition pane.
- In the Modify transition section, select the entry Other sound from the Sound drop-down menu.
- Select the Loop until next sound checkbox if you want the sound to restart once it is finished.
| Do not click the Apply to all button, otherwise your selected sound will restart at every slide. |
Removing a transition effect
- Select the desired slides.
- Choose No Transition in the list on the Slide Transition page of the Tasks pane.
| Content on this page is licensed under the Creative Common Attribution 3.0 license (CC-BY). |