Difference between revisions of "Documentation/OOo3 User Guides/Impress Guide/Formatting text"
(New page: {{DISPLAYTITLE:Formatting text}} {{Documentation/IG3Ch3TOC |ShowPrevNext=block |PrevPage=Documentation/OOo3_User_Guides/Impress Guide/Inserting text |NextPage=Documentation/OOo3_User_Guide...) |
|||
| (3 intermediate revisions by 3 users not shown) | |||
| Line 38: | Line 38: | ||
* For the ''Indents and Spacing'', ''Alignment'', and ''Tabs'' pages of a style, refer to [[Documentation/OOo3_User_Guides/Impress Guide/Formatting paragraphs|Formatting paragraphs]]. | * For the ''Indents and Spacing'', ''Alignment'', and ''Tabs'' pages of a style, refer to [[Documentation/OOo3_User_Guides/Impress Guide/Formatting paragraphs|Formatting paragraphs]]. | ||
| − | The other tabs of the Presentation Style dialog box are all related to bullets and numbering and are described in [[Documentation/OOo3_User_Guides/Impress Guide/ | + | The other tabs of the Presentation Style dialog box are all related to bullets and numbering and are described in [[Documentation/OOo3_User_Guides/Impress Guide/Bulleted and numbered lists|Creating bulleted and numbered lists]]. |
| − | For additional details on the other tabs in the Graphics Style dialog box, please refer to | + | For additional details on the other tabs in the Graphics Style dialog box, please refer to [[Documentation/OOo3_User_Guides/Impress_Guide/Formatting_Graphic_Objects|Formatting Graphic Objects]]. |
| − | {{ | + | {{Note| When Asian typography is activated ('''Tools > Options > Language Settings > Languages'''), the dialog boxes above contain an additional page to set some high-level options for Asian typography, the ''Fonts'' page contains additional information, and the ''Alignment'' page is slightly different.}} |
== Selecting text == | == Selecting text == | ||
| Line 50: | Line 50: | ||
* To format only ''part'' of the text, click once on the text, then select the text to be formatted by clicking and dragging (highlighting) over it. You can also use keyboard combinations to select text: move the cursor where you want to begin your selection, press ''Shift'' and then use the arrow buttons to extend your selection. Formatting changes will apply only to the selected text. | * To format only ''part'' of the text, click once on the text, then select the text to be formatted by clicking and dragging (highlighting) over it. You can also use keyboard combinations to select text: move the cursor where you want to begin your selection, press ''Shift'' and then use the arrow buttons to extend your selection. Formatting changes will apply only to the selected text. | ||
| − | {{ | + | {{Tip| Pressing the ''Control'' key along with the ''Shift'' key while creating a selection is useful to speed up the process. This combination highlights the text word by word instead of character by character. To speed up the selection even further, you can combine the ''Shift'' key with the ''Home'' key or the ''End'' key to extend the selection up to the start or end of the line in which the cursor is positioned, respectively.}} |
{{CCBY}} | {{CCBY}} | ||
[[Category: Impress Guide (Documentation)]] | [[Category: Impress Guide (Documentation)]] | ||
Latest revision as of 20:27, 15 July 2018
Formatting text can give a presentation a consistent look and a dynamic feel. The appropriate use of formatting can even enhance the audience’s understanding of your message by holding their interest.
Whenever you enter text, either in an AutoLayout text box or in a normal text box, it already comes with an underlying style. Generally this style is the outline level of the point where the text was entered for AutoLayout text boxes or the Default Graphic style for text boxes. Sometimes, as seen also in the Pasting text section, it is very useful to re-apply the baseline style to a selection of text, thus eliminating any manual formatting applied to it (particularly if you made a mistake and you do not know how to undo it). On these occasions, select the manually formatted text, and then select Format > Default formatting from the menu bar.
Using styles to format text
This chapter describes ways to apply manual formatting, but you are encouraged to use styles to really get the best out of Impress. The good news is that all the information given here can be immediately reused for applying styles. Chapter 2 describes how to use styles efficiently and the difference between the presentation and graphic styles available in Impress.
Modifying a style
In Impress there are two categories of styles: presentation styles and graphics styles. When inserting text in an AutoLayout area, the presentation styles become available, while when inserting text in a text box or a graphic object it is possible to apply the graphic styles.
It is possible to create new graphics styles, but not the presentation styles which are fixed and can only be modified.
To modify a style, follow these steps:
- Open the Styles and Formatting window by pressing F11 or selecting Format > Styles and Formatting from the menu bar.
- Select the style category by clicking on either the Presentation Styles icon or the Graphic Styles icon at the top of the Style and Formatting window.
- Right-click on the style to be modified and select Modify from the pop-up menu.
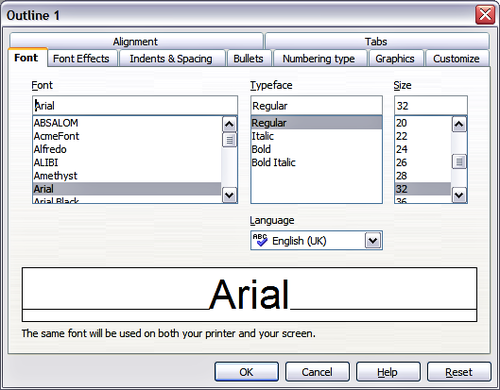
If you have selected a presentation style, the dialog box below is shown.
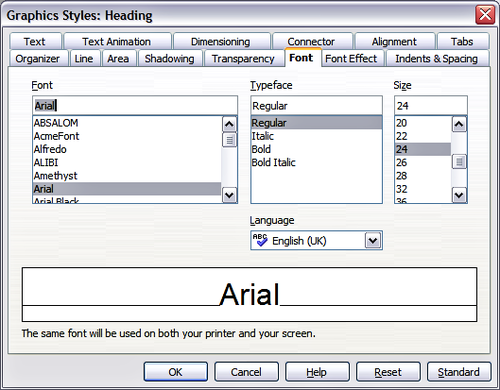
The dialog box for making modifications to a graphics style is shown below.
The Presentation Style dialog box shares five pages with the Graphics Style dialog box; these are the ones that determine the formatting of the text.
There is no difference between the parameters that characterize a style and the attributes given manually to portions of text: in fact the same dialogs boxes are used in both cases. Therefore once you master the formatting of text, you will know how to create and modify a style. In particular:
- For the Font and Font Effects pages of a style, refer to Formatting characters.
- For the Indents and Spacing, Alignment, and Tabs pages of a style, refer to Formatting paragraphs.
The other tabs of the Presentation Style dialog box are all related to bullets and numbering and are described in Creating bulleted and numbered lists.
For additional details on the other tabs in the Graphics Style dialog box, please refer to Formatting Graphic Objects.
Selecting text
Text must be selected before it can be formatted manually.
- To format all the text in a text box, click once on the text, then click once on the border of the text box. Only the green resizing handles are displayed. Now any formatting changes will apply to all the text in the text box.
- To format only part of the text, click once on the text, then select the text to be formatted by clicking and dragging (highlighting) over it. You can also use keyboard combinations to select text: move the cursor where you want to begin your selection, press Shift and then use the arrow buttons to extend your selection. Formatting changes will apply only to the selected text.
| Content on this page is licensed under the Creative Common Attribution 3.0 license (CC-BY). |

