Difference between revisions of "Documentation/OOo3 User Guides/Getting Started/Editing a Fontwork object"
(New page: {{DISPLAYTITLE:Editing a Fontwork object}} {{Documentation/GS3GgraphicsTOC |ShowPrevNext=block |PrevPage=Documentation/OOo3_User_Guides/Getting Started/What is Fontwork? |NextPage=Document...) |
(→Positioning options) |
||
| (2 intermediate revisions by 2 users not shown) | |||
| Line 5: | Line 5: | ||
|NextPage=Documentation/OOo3_User_Guides/Getting Started/Creating Web Pages | |NextPage=Documentation/OOo3_User_Guides/Getting Started/Creating Web Pages | ||
}}__notoc__ | }}__notoc__ | ||
| − | Now that the Fontwork object is created, you can edit some of its attributes. To do this, you can use the Fontwork toolbar, the Formatting toolbar, or menu options as described in this section. | + | Now that the Fontwork object is created, you can edit some of its attributes. To do this, you can use the Fontwork toolbar, the Formatting toolbar, or menu options as described in this section. If the selected Fontwork object is a 3D object, you can also use the 3D-Settings toolbar. |
== Using the Fontwork toolbar == | == Using the Fontwork toolbar == | ||
| Line 12: | Line 12: | ||
Click on the different icons to edit Fontwork objects. | Click on the different icons to edit Fontwork objects. | ||
| − | [[Image:FontworkShapesIcon.png]] '''Fontwork Shape''': Edits the shape of the selected object. You can choose from a palette of shapes, as shown | + | [[Image:FontworkShapesIcon.png]] '''Fontwork Shape''': Edits the shape of the selected object. You can choose from a palette of shapes, as shown below. |
| − | : [[Image:FontworkShapes.png|thumb|none|500px| | + | : [[Image:FontworkShapes.png|thumb|none|500px|Fontwork toolbar showing palette of shapes.]] |
| − | [[Image:FWSameLtrHIcon.png]] '''Fontwork Same Letter Heights''': Changes the height of characters in the object. Toggles between normal height (some characters taller than others, for example capital letters, d, h, l and others) and all letters the same height | + | [[Image:FWSameLtrHIcon.png]] '''Fontwork Same Letter Heights''': Changes the height of characters in the object. Toggles between normal height (some characters taller than others, for example capital letters, d, h, l and others) and all letters the same height. |
| − | : [[Image:FWSameLtrHt.png|thumb|none|500px| | + | : [[Image:FWSameLtrHt.png|thumb|none|500px|Left: normal letters; right: same letter heights.]] |
[[Image:FWAlignIcon.png]] '''Fontwork Alignment''': Changes the alignment of characters. Choices are left align, center, right align, word justify, and stretch justify. The effects of the text alignment can only be seen if the text spans over two or more lines. In the stretch justify mode, all the lines are filled completely. | [[Image:FWAlignIcon.png]] '''Fontwork Alignment''': Changes the alignment of characters. Choices are left align, center, right align, word justify, and stretch justify. The effects of the text alignment can only be seen if the text spans over two or more lines. In the stretch justify mode, all the lines are filled completely. | ||
| Line 31: | Line 31: | ||
Now let us go further and customize the Fontwork object with several more attributes. | Now let us go further and customize the Fontwork object with several more attributes. | ||
| − | Click on the Fontwork object. The Formatting toolbar changes to show all the options for editing the object. ( | + | Click on the Fontwork object. The Formatting toolbar changes to show all the options for editing the object. (The toolbar shown below appears when you use Fontwork in Writer.) |
| − | + | [[Image:FontworkFormatBar.png|thumb|none|600px|''Formatting toolbar with a Fontwork object selected in Writer'']] | |
| − | + | This figure shows the toolbar floating. In its default, docked position it is one of the toolbars located below the menu bar. The example toolbar has also been customized to show all of the available options; by default only a subset of these options is shown. | |
| − | + | On the Formatting toolbar you have a large choice of options for customizing your object. These choices are the same as the ones for other drawing objects. For more information, see the ''Draw Guide''. | |
=== Line options === | === Line options === | ||
| − | '''Line''' icon: Opens a dialog | + | '''Line''' icon: Opens a dialog with three tabs: '''Line''', '''Line Styles''', '''Arrow Styles'''. |
* Use the '''Line''' tab to edit the most common properties of the line around the selected Fontwork object, by choosing from previously-defined attributes including line style, line color, and arrow styles. | * Use the '''Line''' tab to edit the most common properties of the line around the selected Fontwork object, by choosing from previously-defined attributes including line style, line color, and arrow styles. | ||
| Line 52: | Line 52: | ||
'''Line Color''' box: Select the color of the line. | '''Line Color''' box: Select the color of the line. | ||
| − | |||
| − | |||
=== Area options === | === Area options === | ||
| − | '''Area''' icon: Opens a dialog | + | '''Area''' icon: Opens a dialog with seven tabs: '''Area''', '''Shadow''', '''Transparency''', '''Colors''', '''Gradients''', '''Hatching''', '''Bitmaps'''. |
* '''Area''' tab: Choose from the predefined list a color, bitmap, gradient or hatching pattern to fill the selected object. | * '''Area''' tab: Choose from the predefined list a color, bitmap, gradient or hatching pattern to fill the selected object. | ||
| Line 67: | Line 65: | ||
'''Area Style / Filling''' boxes: Select the type of the fill of the selected object. For more detailed settings, use the Area icon. | '''Area Style / Filling''' boxes: Select the type of the fill of the selected object. For more detailed settings, use the Area icon. | ||
| − | |||
| − | |||
=== Positioning options === | === Positioning options === | ||
| Line 83: | Line 79: | ||
'''Send to back''' icon: Moves the selected object behind the others. | '''Send to back''' icon: Moves the selected object behind the others. | ||
| − | '''Change | + | '''Change Anchor''' icon: Switch between anchoring options: |
* To Page - The object keeps the same position in relation to the page margins. It does not move as you add or delete text. | * To Page - The object keeps the same position in relation to the page margins. It does not move as you add or delete text. | ||
| Line 97: | Line 93: | ||
You can use some the choices on the '''Format''' menu to anchor, align, arrange and group selected Fontwork objects, wrap text around them, and flip them horizontally and vertically. | You can use some the choices on the '''Format''' menu to anchor, align, arrange and group selected Fontwork objects, wrap text around them, and flip them horizontally and vertically. | ||
| − | You can also right-click on a Fontwork object and choose many of the same options from the pop-up menu. In addition, the pop-up menu provides quick access to the Line, Area, Text, and Position and Size dialogs | + | You can also right-click on a Fontwork object and choose many of the same options from the pop-up menu. In addition, the pop-up menu provides quick access to the Line, Area, Text, and Position and Size dialogs. The Text dialog offers only a few options for Fontwork objects and is not discussed here. On the Position and Size dialog, you can enter precise values concerning size and position. For more information on all of these menu options, see the ''Draw Guide''. |
| − | + | ==Using the 3D-Settings toolbar== | |
| + | If the selected Fontwork object is a 3D object, you can also use the options on the 3D-Settings toolbar. You can also change a 2D Fontwork object into a 3D object (or change a 3D object into a 2D object) by clicking the Extrusion On/Off icon on the 3D-Settings toolbar. For more information, see the ''Draw Guide''. | ||
| − | [[Image: | + | [[Image:3Dsettingstoolbar.png|thumb|none|500px|3D-Settings toolbar.]] |
= Moving and resizing Fontwork objects = | = Moving and resizing Fontwork objects = | ||
When you select a Fontwork object, eight blue squares (known as ''handles'') appear around the edge of the object. You can drag these handles to resize the object. | When you select a Fontwork object, eight blue squares (known as ''handles'') appear around the edge of the object. You can drag these handles to resize the object. | ||
| − | A yellow dot also appears on the object. This dot may be along an edge of the object, or it may be somewhere else; see | + | A yellow dot also appears on the object. This dot may be along an edge of the object, or it may be somewhere else; see below for an example. If you hover the pointer over this yellow dot, the pointer turns into a hand symbol. You can drag the dot in different directions to distort the object. |
[[Image:FWYellowDot.png|thumb|none|500px|''Yellow dot'']] | [[Image:FWYellowDot.png|thumb|none|500px|''Yellow dot'']] | ||
Latest revision as of 17:50, 6 November 2010
Now that the Fontwork object is created, you can edit some of its attributes. To do this, you can use the Fontwork toolbar, the Formatting toolbar, or menu options as described in this section. If the selected Fontwork object is a 3D object, you can also use the 3D-Settings toolbar.
Using the Fontwork toolbar
Make sure that the Fontwork toolbar is visible. If you do not see it, go to View > Toolbars > Fontwork.
Click on the different icons to edit Fontwork objects.
![]() Fontwork Shape: Edits the shape of the selected object. You can choose from a palette of shapes, as shown below.
Fontwork Shape: Edits the shape of the selected object. You can choose from a palette of shapes, as shown below.
-
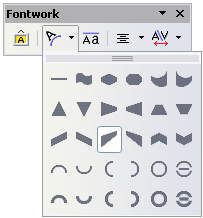 Fontwork toolbar showing palette of shapes.

![]() Fontwork Same Letter Heights: Changes the height of characters in the object. Toggles between normal height (some characters taller than others, for example capital letters, d, h, l and others) and all letters the same height.
Fontwork Same Letter Heights: Changes the height of characters in the object. Toggles between normal height (some characters taller than others, for example capital letters, d, h, l and others) and all letters the same height.
-
 Left: normal letters; right: same letter heights.

![]() Fontwork Alignment: Changes the alignment of characters. Choices are left align, center, right align, word justify, and stretch justify. The effects of the text alignment can only be seen if the text spans over two or more lines. In the stretch justify mode, all the lines are filled completely.
Fontwork Alignment: Changes the alignment of characters. Choices are left align, center, right align, word justify, and stretch justify. The effects of the text alignment can only be seen if the text spans over two or more lines. In the stretch justify mode, all the lines are filled completely.

![]() Fontwork Character Spacing: Changes the character spacing and kerning in the object. For custom spacing, input a percentage value: 100% is normal spacing; less than 100% is tight spacing; more than 100% is expanded spacing.
Fontwork Character Spacing: Changes the character spacing and kerning in the object. For custom spacing, input a percentage value: 100% is normal spacing; less than 100% is tight spacing; more than 100% is expanded spacing.

Using the Formatting toolbar
Now let us go further and customize the Fontwork object with several more attributes.
Click on the Fontwork object. The Formatting toolbar changes to show all the options for editing the object. (The toolbar shown below appears when you use Fontwork in Writer.)

This figure shows the toolbar floating. In its default, docked position it is one of the toolbars located below the menu bar. The example toolbar has also been customized to show all of the available options; by default only a subset of these options is shown.
On the Formatting toolbar you have a large choice of options for customizing your object. These choices are the same as the ones for other drawing objects. For more information, see the Draw Guide.
Line options
Line icon: Opens a dialog with three tabs: Line, Line Styles, Arrow Styles.
- Use the Line tab to edit the most common properties of the line around the selected Fontwork object, by choosing from previously-defined attributes including line style, line color, and arrow styles.
- Use the Lines Styles and Arrow Styles tabs to edit the properties of line and arrow styles, and define new styles.
Arrow Style icon: Choose from the different arrow styles.
Line Style box: Choose from the available line styles.
Line Width box: Set the width of the line.
Line Color box: Select the color of the line.
Area options
Area icon: Opens a dialog with seven tabs: Area, Shadow, Transparency, Colors, Gradients, Hatching, Bitmaps.
- Area tab: Choose from the predefined list a color, bitmap, gradient or hatching pattern to fill the selected object.
- Shadow tab: Set the shadow properties of the selected object.
- Transparency tab: Set the transparency properties of the selected object.
- Colors tab: Modify the available colors or add new ones to appear on the Area tab.
- Gradients tab: Modify the available gradients or add new ones to appear on the Area tab.
- Hatching tab: Modify the available hatching patterns or add new ones to appear on the Area tab.
- Bitmaps tab: Create simple bitmap patterns and import bitmaps, to make them available on the Area tab.
Area Style / Filling boxes: Select the type of the fill of the selected object. For more detailed settings, use the Area icon.
Positioning options
Rotate icon: Rotate the selected object manually using the mouse to drag the object.
To Foreground icon: Moves the selected object in front of the text.
To Background icon: Moves the selected object behind the text.
Alignment icon: Modifies the alignment of the selected objects.
Bring to front icon: Moves the selected object in front of the others.
Send to back icon: Moves the selected object behind the others.
Change Anchor icon: Switch between anchoring options:
- To Page - The object keeps the same position in relation to the page margins. It does not move as you add or delete text.
- To Paragraph - The object is associated with a paragraph and moves with the paragraph. It may be placed in the margin or another location.
- To Character - The object is associated with a character but is not in the text sequence. It moves with the paragraph but may be placed in the margin or another location. This method is similar to anchoring to a paragraph.
- As Character - The object is placed in the document like any character and moves with the paragraph as you add or delete text before the object.
Ungroup icon: Ungroups the selected objects, so you can manage them individually.
Group icon: Groups the selected objects, so you can manage them as a single object.
You can use some the choices on the Format menu to anchor, align, arrange and group selected Fontwork objects, wrap text around them, and flip them horizontally and vertically.
You can also right-click on a Fontwork object and choose many of the same options from the pop-up menu. In addition, the pop-up menu provides quick access to the Line, Area, Text, and Position and Size dialogs. The Text dialog offers only a few options for Fontwork objects and is not discussed here. On the Position and Size dialog, you can enter precise values concerning size and position. For more information on all of these menu options, see the Draw Guide.
Using the 3D-Settings toolbar
If the selected Fontwork object is a 3D object, you can also use the options on the 3D-Settings toolbar. You can also change a 2D Fontwork object into a 3D object (or change a 3D object into a 2D object) by clicking the Extrusion On/Off icon on the 3D-Settings toolbar. For more information, see the Draw Guide.

Moving and resizing Fontwork objects
When you select a Fontwork object, eight blue squares (known as handles) appear around the edge of the object. You can drag these handles to resize the object.
A yellow dot also appears on the object. This dot may be along an edge of the object, or it may be somewhere else; see below for an example. If you hover the pointer over this yellow dot, the pointer turns into a hand symbol. You can drag the dot in different directions to distort the object.

Hovering the pointer over other parts of the object turns the pointer into the usual symbol for dragging the object to another part of the page.
For precise control of the location and size of the object, use the Position and Size dialog.
| Content on this page is licensed under the Creative Common Attribution 3.0 license (CC-BY). |