Creating database tables
| In a database, a table stores information for a group of things we call fields. For example, a table might hold an address book, a stock list, a phone book or a price list. A database can have from one to several tables. |
To work with tables, click the Tables icon in the Database list, or use Alt+a. The three tasks that you can perform on a table are in the Task list.

Using the Wizard to create a table
| Every table requires a Primary key field. (What this field does will be explained later.) We will use this field to number our entries and want that number to automatically increase as we add each entry. |
Since none of the fields we need for our Automobile database are contained in any of the wizard tables, we will create a simple table using the wizard that has nothing to do with our database. This section is an exercise in explaining how the Wizard works.
The Wizard permits the fields of the table to come from more than one suggested table. We will create a table with fields from three different suggested tables in the Wizard.
From the Tasks Pane click Use Wizard to Create Table. This opens the Table Wizard.
| A field in a table is one bit of information. For example, in a price list table, there might be one field for item name, one for the description and a third for the price. More fields may be added as needed. |
Step 1: Select fields.
You have a choice of two categories of suggested tables: Business and Personal. Each category contains its own suggested tables from which to choose. Each table has a list of available fields. Select the sample table you want to use from the drop-down menu. For the sake of an example we will click on the Personal button, and then choose CD-Collection from the drop-down menu. Each table has a set of fields that will appear below the sample table you have chosen.
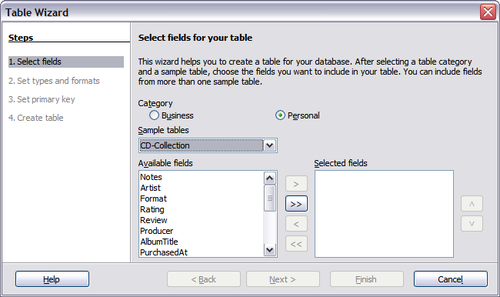 Table Wizard: Selecting Fields.

- Available Fields: Using the > button, move these fields from the Available fields window to the Selected fields window in this order: Notes, Artist, Format, Rating, and so forth.
- If a mistake is made in the order as listed above, click on the field name that is in the wrong order to select it. Use the Up or Down arrow on the right side of the Selected Fields list to move the field name to the correct position, then click Next .
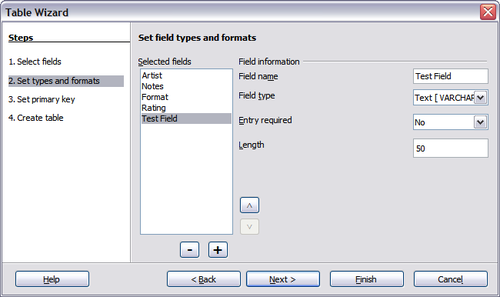
Step 2: Set field types and formats.
In this step you give the fields their properties. When you click a field, the information on the right changes. You can then make changes to meet your needs. Click each field, one at a time, and make the changes listed below.
-
 Setting Field Types and Format.
-

- You can add or take out fields by using the + and - buttons.
- If you add a field enter the Field Information by, first entering the Field Name then using the drop-down menus to select the Field Type and Entry Required. The latter is a Yes/NoField. You can also state how many characters a field is to have. Unless you have a field that exceeds 100 characters in length counting the spaces, do not change the length.
In Base the field type must be specified. These types include text, integer, date and decimal. If the field is going to have general information in it (for example a name or a description), then you want to use text. If the field will always contain a number (for example a price), the type should be decimal or another appropriate numerical field. The wizard picks the right field type, so to get an idea of how this works, see what the wizard has chosen for different fields.
To find definitions for the 'Field type' see https://www.wikipedia.org/ select your language option and type in the definition you would like in the Search box.
| In Base the maximum length of each field must be specified on creation. It is not easy to change this later, so if in doubt, specify a greater length. Base uses VCHAR as the field format for text fields. This format only uses the actual number of characters in a field up to the limit set. So, a field containing 20 characters will only use space for 20 characters even if the limit is set at 100. So, two album titles containing 25 and 32 characters respectively will use space for 25 and 32 characters and not 100 characters. |
- From this screen you can also alter the position of the fields in the Selected fields list by using the Up and Down arrows. See the example below. When you have finished, click Next .
-
 Order of fields and adding a new field.
-
-
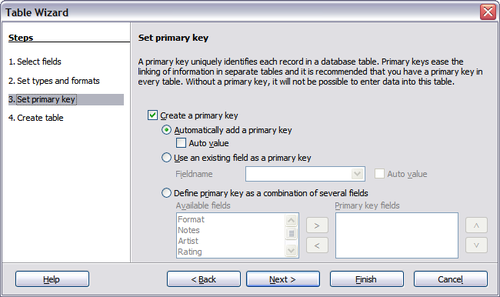 "Setting the Primary Key
-
- Create a primary key should be checked.
- Select option Use an existing field as a primary key.
- In the Fieldname drop down list, select the field that you want to uniquely identify (or record) in the table.
- Check Auto value if it is not already checked.
- Click Next .
- If desired, rename the table at this point. If you rename it, make the name meaningful to you. For this example, make no changes.
- Leave the option Insert data immediately checked.
- Click Finish to complete the table wizard. Close the window created by the table wizard. You are now back to the main window of the database with the listing of the tables, queries, forms, and reports.
- Click on the Tables icon in the Database pane to see the existing tables.
- Right-click on the CD-Collection table icon. Select Copy from the context menu.
- Move the mouse pointer below this table, right-click, and select Paste from the context menu. The Copy table window opens.
- Change the table name to Pop and click Next.
- Click the >> button to move all the Fields from the left window to the right window and click Next.
- Since all the Fields already have the proper File Type formating, no changes should be needed. However, this is the time and place to make these changes if they are needed. (See Caution below for the reason why.) Click Create. The new table is created.
- Click Create Table in Design View.
- FuelID entries:
- Enter FuelID as the first Field Name.
- Select Integer [INTEGER] as the Field Type from the dropdown list. (The default setting is Text[VARCHAR].)
- Change the Field Properties in the bottom section. Change AutoValue from No to Yes.
-
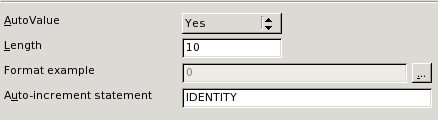 Field Properties section (AutoValue).
 - Set FuelID as the Primary key. Right-click on the green triangle to the left of FuelID.
-
 Primary key field.
 - All other entries:
- Enter the next field name in the first column (Field Name column).
- Select the Field Type for each field.
- For Date use Date [DATE]. (Use the D key once to select it.)
- PaymentType uses Text [VARCHAR], the default setting.
- All other fields use Number [NUMERIC]. (Use the N key once to select it.)
- Select the Field Properties.
-
 Field Properties section.
 - FuelCost, FuelQuantity, and Odometer need changes in the Field Properties section.
- FuelQuantity: Change Length to 6 and Decimal places to 3. (Many fuel pumps measure fuel to thousands of a gallon in the USA where I live.)
- Odometer: Change the Length to 10 and the Decimal places to 1.
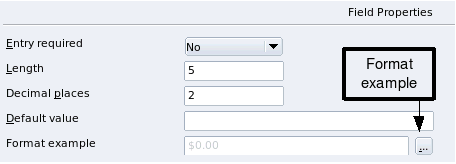
- FuelCost: Change the Length to 5 and Decimal places to 2. Click the Format example button. This opens the Field Format window.
-
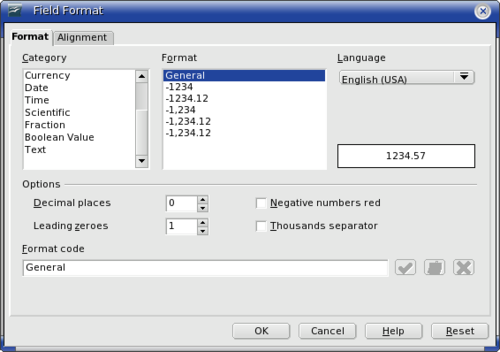 Field Format options.
 - Use Currency as the Category and your currency as the Format. My currency has two decimal places. Use what is appropriate for your currency.
- Repeat these steps for each field in the table. To access additional formatting options, click the button to the right of the Format example panel (Format example button).
- Description can be anything, or can be left blank. (The figure below is an example of this.)
- To save and close the table, select File > Close. Name the table Fuel.
-
 Example of Description entries.
 - Follow the directions in Creating tables in Design View. In the table we will create, the two fields can be Type and PaymentID. Make sure that the AutoValue is set to Yes for the PaymentID field. Set the PaymentID field as the primary key.
- Save the table using the name Payment Type.
-
 Table in Design View.
-
- In the main database window, click on the Tables icon. Right-click on Payment Type and select Open from the context menu.
- Enter Dan in the first row. Use the tab key to move to the second row.
- Enter Kevin in the second row.
- Enter Cash in the third row.
- Save and close the table window.

| If any of these fields requires an entry, set Entry required to Yes. If Entry required is set to Yes, this field must have something in it. For example if Artist has Entry required set to Yes, having an entry with the artist missing will not be allowed. In general, only set Entry required to Yes if something must always be put in that field. By default, Entry required is set to No. |
Step 3: Set primary key.

The simplest method is to assign a unique number to each one: number the first item 1, the second 2, and so on. Each entry has one number and every number is different, so it is easy to say "record ID 172". This is the option chosen here: the field you selected is just a number assigned automatically by Base to each record of this table.
There are more complex ways of doing this, all answering the question "How do I make sure that every single record in my database can be uniquely identified?"}}
Step 4: Create the table.
Creating a table by copying an existing table
If you have a large collection of music, you might want to create a table for each type of music you have. Rather than creating each table from the wizard, you can make a copy of the original table. Each table can be named according to the type of music contained in it. Possible names could include Classical, Pop, Country and Western, and Rock among others.
| Once tables have been created using the wizard, editing them should be very limited if any editing is done at all. Fields can be added or deleted. But adding a field requires taking the time to enter the data for that one field for every record having an entry for that field. Deleting a field deletes all the data once contained in that field. Changing the field type of a field can lead to data being lost either partially or completely. When creating a new table, it pays to create the fields with the correct names, length and format before data is added. |
| Tables can be deleted in a very simple way. But doing so removes all of the data contained in every field of the table. Unless you are sure, do not delete a table.
To delete a table, right-click it in the list of tables. Select Delete from the context menu. A popup window asks if you are sure you want to delete the table. Once you click Yes, the table and its data are gone forever unless you have a backup. |
Creating tables in Design View
Design View is a more advanced method for creating a new table. It allows you to directly enter information about each field in the table. We will use this method for the tables of our database.
| While the Field type and formatting are different in Design View, the concepts are the same as in the Wizard. |
The first table to be created is Fuel. Its fields are FuelID, Date, FuelCost, FuelQuantity, Odometer, and PaymentType. FuelCost uses currency and two decimal places. FuelQuantity and Odometer use the number format with 3 decimal places and 1 decimal place respectively. PaymentType uses the text format.
| Shortcut for selecting from the Field Type dropdown list: use the key for the first letter of the choice. This might require using the letter more than once to get the choice you want. You can cycle through the choices for a given letter by repeatedly using that letter. After typing the name of the field in the Fields column, use the Tab key to move to the Field Type column. This will enter the field name and highlight the dropdown list. You can then use the key for the first letter of your choice to select the field type. Just remember to use it the correct number of times if necessary. |

Note - The 'Auto-increment' option is Not Applicable in version 3.2.1.
Click Primary Key in the context menu. This places a key icon in front of FuelID.
| The primary key serves only one purpose. Any name can be used for this field. It is not necessary to use FuelID as the name of the primary key field. We have used it so we know to which table it belongs by its name. |


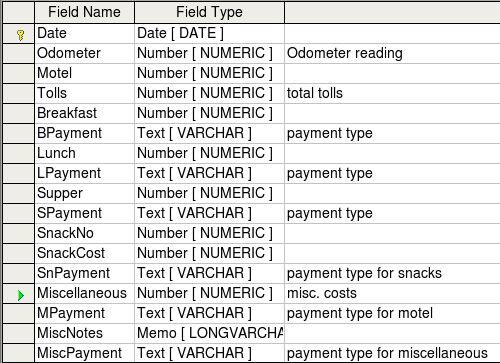
Follow the same steps to create the Vacations table. The fields and their field types are listed in Figure 9. Make sure you make Date field the primary key before closing. (Right click the Grey box to the left of Date. Select Primary key from the context menu.) Name the table Vacations, and save it.
Creating tables for the list box
When the same information can be used in several fields, design a table for each type of information. Each table will contain two fields: the information field, and ID in this order.
| You must create these tables with the information field listed first and the and the ID field listed last. Failure to do so will produce the wrong results. For my Payment table, I use Name and ID as my fields, with Dan, Kevin, and Cash being the Name entries. The corresponding ID entries are 0, 1, 2. When the Name field is listed first in the table, one of the three names will appear in the payment field of the Fuel table. If the ID field is listed first, 0, 1, or 2 appear in the payment field instead. |
| If you have several tables to create with the same fields, design one table and produce the other tables by cutting and pasting. (See Creating a table by copying an existing table.) |
Adding data to the list table
List tables do not require a form. Instead, add their data directly to the table. In this example, use the names of the two people with a bank card and Cash for cash purchases.
| The Enter key can also be used to move from field entry to field entry. For this example, enter Jan. in the first Name field. Enter moves the cursor to the ID field. Enter then moves the cursor to the second Name field. The Down Arrow key can also be used to move from row to row. |
| The PaymentID field contains <AutoField> until you use the Enter key to move to the second row. Then it becomes a 0. As you add the entries to each row, the rows of the PaymentID field change to consecutive whole numbers. For example the first three numbers in this field are 0,1,2. |
| Content on this page is licensed under the Creative Common Attribution 3.0 license (CC-BY). |