Adding and formatting text
Text in slides is contained in text boxes.
There are two ways to add text boxes to a slide:
- Choose a predefined layout from the Layouts section of the Tasks pane. These text boxes are called AutoLayout text boxes.
- Create a text box using the text tool.
Using text boxes created from the Layout pane
In Normal view:
- Click in the text box that reads Click to add text, Click to add an outline, or a similar notation.
- Type or paste your text in the text box.
Using text boxes created from the text box tool
In Normal View:
- Click on the Text icon
 on the Drawing toolbar. If the toolbar with the text icon is not visible, choose View > Toolbars > Drawing.
- Click and drag to draw a box for the text on the slide. Do not worry about the vertical size and position—the text box will expand if needed as you type.
- Release the mouse button when finished. The cursor appears in the text box, which is now in edit mode (gray hashed border with green resizing handles).
- Type or paste your text in the text box.
- Click outside the text box to deselect it.

You can move, resize, and delete text boxes. For more information, see Chapter 3 in the Impress Guide.
| In addition to the normal text boxes where text is horizontally aligned, it is possible to insert text boxes where the text is aligned vertically. This choice is available only when Asian languages are enabled in Tools > Options > Language Settings > Languages.
Click on the |
Quick Font Resizing
Impress has convenient buttons on the Formatting toolbar to increase or decrease font size of selected text. ![]() The amount by which the font size changes depends on the standard sizes available for the font in use.
The amount by which the font size changes depends on the standard sizes available for the font in use.
Pasting text
You can insert text into a text box by copying it from another document and pasting it into Impress. However, the pasted text will probably not match the formatting of the surrounding text or that of the other slides in the presentation. This may be what you want on some occasions, however in most cases you want to make sure that the presentation does not become a patchwork of different paragraph styles, font types, bullet points and so on. There are several ways to ensure consistency; these methods are explained below.
Pasting unformatted text
It is normally good practice to paste text without formatting and apply the formatting later. To paste without formatting, either press Control+Shift+V and then select Unformatted text from the dialog that appears, or click on the small black triangle next to the paste symbol in the standard toolbar ![]() and select Unformatted text. The unformatted text will be formatted with the outline style at the cursor position in an AutoLayout text box or with the default graphic style in a normal text box.
and select Unformatted text. The unformatted text will be formatted with the outline style at the cursor position in an AutoLayout text box or with the default graphic style in a normal text box.
Formatting pasted text
If pasting the text into an AutoLayout area, then to give the pasted text the same look and feel of the rest of the presentation. you need to apply the appropriate outline style to the text.
- Paste the text in the desired position. Do not worry if it does not look right: it will in a minute.
- Select the text you have just pasted.
- Select Format > Default formatting from the menu bar.
- Use the four arrow buttons in the Text Formatting toolbar
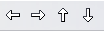 to move the text to the appropriate position and give it the appropriate outline level. The button with the arrow pointing left promotes the list entry by one level (for example from Outline 3 to Outline 2), the right arrow button demotes the list entry by one level, the up and down arrow buttons move the list entry.
- Apply manual formatting as required to sections of the text (to change font attributes, tabs, and so on).
If you are pasting text in a text box, you can still use styles to quickly format the text. Note that one and only one graphic style can be applied to the copied text. To do that:
- Paste the text in the desired position.
- Select the text you have just pasted.
- Select the desired graphic style.
- Apply manual formatting as required to sections of the text.
| Presentation styles are very different from Writer styles and are applied in quite a different way. |
Creating bulleted and numbered lists
The procedure to create a bulleted or numbered list is quite different depending on the type of text box used, although the tools to manage the list and customize the appearance are the same.
In text boxes created automatically by Impress (called AutoLayout), the outline styles available are by default bulleted lists, while for normal text boxes an additional step is required to create a bulleted list.
Creating lists in AutoLayout text boxes
Every text box included in the available layouts is already formatted as a bulleted list, therefore to create a bulleted list the only necessary steps are:
- From the Layout pane, choose a slide design that contains a text box. Those are easily recognizable from the thumbnail.
- Click in the text box that reads Click to add an outline.
- Type the text, then press Enter to start a new bulleted line.
- The default list type is a bulleted list. The mechanisms to change the list from bulleted to numbered and vice versa are explained in Changing the appearance of the list.
| Press Shift + Enter to start a new line without creating a new bullet or number. The new line will have the same indentation of the previous line. Press instead the button bullets on/off on the text formatting toolbar for a line without bullet. If the text formatting toolbar is not showing, enable it selecting View > Toolbar > Formatting in the menu bar. |
Creating lists in other text boxes
To create a list in a text box, follow these steps:
- Place the cursor in the text box.
- Click the Bullets On/Off button
 on the text formatting toolbar. If the text formatting toolbar is not showing, enable it by selecting View > Toolbar > Formatting from the menu bar.
- Type the text and press Enter to start a new bulleted line.
- The default list type is a bulleted list. The mechanisms to change the appearance of the list are explained here.
Creating a new outline level
- If necessary, press Enter to begin a new line.
- Press Tab. Each time you press Tab the line indents to the next outline level. Pressing Enter creates a new line at the same level as the previous one. To return to the previous level, press Shift+Tab.
In the AutoLayout text boxes, promoting or demoting an item in the list corresponds to applying a different outline style, so the second outline level corresponds to Outline 2 style, the third to Outline 3 style, and so on.
| Unlike styles in Writer, do not try to change the outline level by selecting the text and then clicking the desired outline style. Due to the way the presentation styles work, it is not possible to apply them in this way. |
Changing the appearance of the list
You can fully customize the appearance of a list, changing the bullet type or numbering for the entire list or for single entry. All the changes can be made using the Bullets and Numbering dialog, which is accessed by selecting Format > Bullets and Numbering or by clicking on the Bullets and Numbering icon ![]() on the text formatting toolbar.
on the text formatting toolbar.
For the entire list:
- Select the entire list or click on the gray border of the text box so that just the green resizing handles are displayed.
- Select Format > Bullets and Numbering or click on the Bullets and Numbering icon.

- The Bullets and Numbering dialog contains five tabs: Bullets, Numbering type, Graphics, Position, and Customize.
- If a bullet list is needed, select the desired bullet style from the six default styles available on the Bullets page.
- If a graphics style is needed, select one from those available on the Graphics page.
- If a numbered list is needed, select one of the 6 default numbering styles on the Numbering type page.
For a single line in the list:
- Click anywhere in the line to place the cursor in it.
- Follow steps 2–4 of the previous instruction set.
If the list was created in an AutoLayout text box, then an alternative way to change the entire list is to modify the Outline styles. Changes made to the outline style will apply to all the slides using them. Sometimes this is what you want; sometimes it is not, so some care must be taken.
| Content on this page is licensed under the Creative Common Attribution 3.0 license (CC-BY). |