Difference between revisions of "Documentation/OOo3 User Guides/Calc Guide/Using the macro recorder"
From Apache OpenOffice Wiki
< Documentation | OOo3 User Guides | Calc Guide
(New page: {{DISPLAYTITLE:Using the macro recorder}} {{Documentation/CG3Ch12TOC |ShowPrevNext=block |PrevPage=Documentation/OOo3_User_Guides/Calc Guide/Calc Macros |NextPage=Documentation/OOo3_User_G...) |
|||
| (7 intermediate revisions by 2 users not shown) | |||
| Line 5: | Line 5: | ||
|NextPage=Documentation/OOo3_User_Guides/Calc Guide/Write your own functions | |NextPage=Documentation/OOo3_User_Guides/Calc Guide/Write your own functions | ||
}}__notoc__ | }}__notoc__ | ||
| − | Chapter | + | Chapter 13 of the [[Documentation/OOo3_User_Guides/Getting_Started/Getting_Started_with_Macros|''Getting Started'']] guide (Getting Started with Macros) provides a basis for understanding the general macro capabilities in OpenOffice.org using the macro recorder. An example is shown here without the explanations in the ''Getting Started'' guide. The following steps create a macro that performs paste special with multiply. |
<ol> | <ol> | ||
| Line 11: | Line 11: | ||
<li>Enter numbers into a sheet.</li> | <li>Enter numbers into a sheet.</li> | ||
| − | [[Image: | + | [[Image:CG3Ch1F1a.png|thumb|none|500px|''Enter numbers.'']] |
<li>Select cell A3, which contains the number 3, and copy the value to the clipboard.</li> | <li>Select cell A3, which contains the number 3, and copy the value to the clipboard.</li> | ||
| Line 17: | Line 17: | ||
<li>Use '''Tools > Macros > Record Macro''' to start the macro recorder. The Record Macro dialog is displayed with a stop recording button.</li> | <li>Use '''Tools > Macros > Record Macro''' to start the macro recorder. The Record Macro dialog is displayed with a stop recording button.</li> | ||
| − | [[Image: | + | [[Image:CG3Ch12F2a.png|thumb|none|500px|''Stop recording button.'']] |
<li>Use '''Edit > Paste Special''' to open the Paste Special dialog.</li> | <li>Use '''Edit > Paste Special''' to open the Paste Special dialog.</li> | ||
| − | [[Image: | + | [[Image:CG3Ch12F3a.png|thumb|none|500px|''Paste Special dialog.'']] |
<li>Set the operation to '''Multiply''' and click '''OK'''. The cells are now multiplied by 3.</li> | <li>Set the operation to '''Multiply''' and click '''OK'''. The cells are now multiplied by 3.</li> | ||
| − | [[Image: | + | [[Image:CG3Ch12F4a.png|thumb|none|500px|''Cells multiplied by 3.'']] |
| − | <li>Click '''Stop Recording''' to stop the macro recorder | + | <li>Click '''Stop Recording''' to stop the macro recorder. The OpenOffice.org Basic Macros dialog opens.</li> |
| − | <li>Select the current document. For this example, the current Calc document is ''Untitled''. | + | <li>Select the current document. For this example, the current Calc document is ''Untitled 1''. Existing documents show a library named Standard. This library is not created until the document is saved, or the library is needed, so at this point your new document does not contain a library. You can create a new library to contain the macro, but this is not necessary.</li> |
| − | [[Image: | + | [[Image:CG3Ch12F5b.png|thumb|none|500px|''Select the Standard library if it exists.'']] |
| − | <li>Click '''New Module''' | + | <li>Click '''New Module'''. If no libraries exist, then the Standard library is automatically created and used. In the New Module dialog, type a name for the new module or leave the name as Module1.</li> |
| − | [[Image: | + | [[Image:CG3Ch12F0.png]] |
| − | <li>Click '''OK''' to create a module named Module1.</li> | + | <li>Click '''OK''' to create a module named Module1. Select the newly created Module1, enter the macro name ''PasteMultiply'' and click '''Save'''. </li> |
| − | [[Image: | + | [[Image:CG3Ch12F6a.png|thumb|none|500px|''Select the module and name the macro.'']] |
| − | <li> | + | <li>The created macro is saved in Module1 of the Standard library in the Untitled 1 document. Listing 1 shows the contents of the macro..</li> |
</ol> | </ol> | ||
| Line 76: | Line 76: | ||
</code> | </code> | ||
| − | More detail on recording macros is provided in Chapter 13 (Getting Started with Macros) in the ''Getting Started'' guide; we recommend you read it if you have not already done so. More detail is also provided in the following sections, but not as related to recording macros. | + | More detail on recording macros is provided in Chapter 13 (Getting Started with Macros) in the [[Documentation/OOo3_User_Guides/Getting_Started/Getting_Started_with_Macros|''Getting Started'']] guide; we recommend you read it if you have not already done so. More detail is also provided in the following sections, but not as related to recording macros. |
{{CCBY}} | {{CCBY}} | ||
[[Category: Calc Guide (Documentation)]] | [[Category: Calc Guide (Documentation)]] | ||
Latest revision as of 11:50, 17 January 2011
Chapter 13 of the Getting Started guide (Getting Started with Macros) provides a basis for understanding the general macro capabilities in OpenOffice.org using the macro recorder. An example is shown here without the explanations in the Getting Started guide. The following steps create a macro that performs paste special with multiply.
- Open a new spreadsheet.
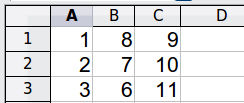
- Enter numbers into a sheet.
- Select cell A3, which contains the number 3, and copy the value to the clipboard.
- Select the range A1:C3.
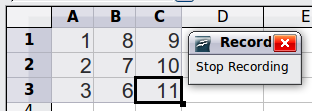
- Use Tools > Macros > Record Macro to start the macro recorder. The Record Macro dialog is displayed with a stop recording button.
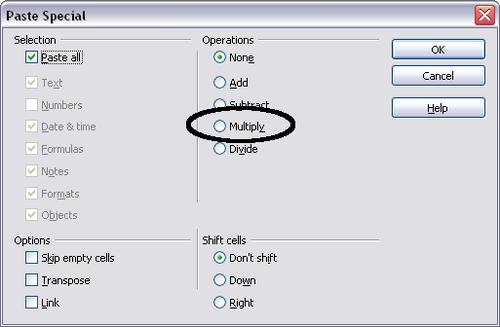
- Use Edit > Paste Special to open the Paste Special dialog.
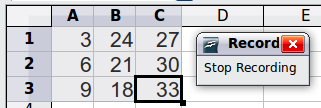
- Set the operation to Multiply and click OK. The cells are now multiplied by 3.
- Click Stop Recording to stop the macro recorder. The OpenOffice.org Basic Macros dialog opens.
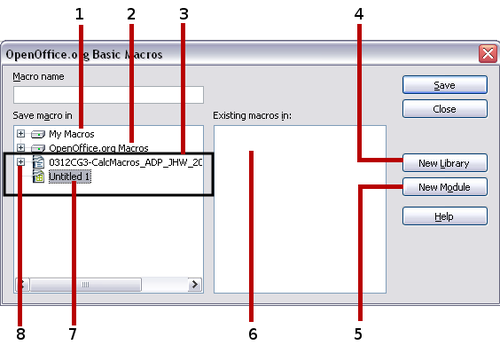
- Select the current document. For this example, the current Calc document is Untitled 1. Existing documents show a library named Standard. This library is not created until the document is saved, or the library is needed, so at this point your new document does not contain a library. You can create a new library to contain the macro, but this is not necessary.
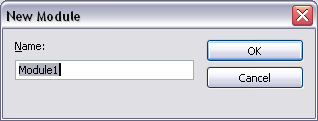
- Click New Module. If no libraries exist, then the Standard library is automatically created and used. In the New Module dialog, type a name for the new module or leave the name as Module1.
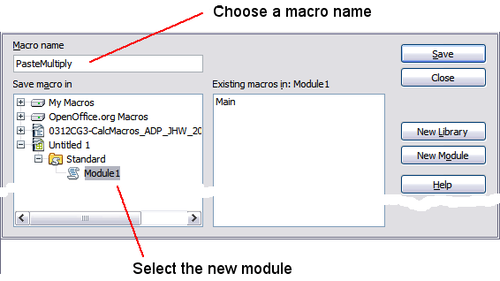
- Click OK to create a module named Module1. Select the newly created Module1, enter the macro name PasteMultiply and click Save.
- The created macro is saved in Module1 of the Standard library in the Untitled 1 document. Listing 1 shows the contents of the macro..
Listing 1. Paste special with multiply.
sub PasteMultiply

 rem --------------------------------------------------------------
 rem define variables
 dim document   as object
 dim dispatcher as object
 rem --------------------------------------------------------------
 rem get access to the document
 document   = ThisComponent.CurrentController.Frame
 dispatcher = createUnoService("com.sun.star.frame.DispatchHelper")

 rem --------------------------------------------------------------
 dim args1(5) as new com.sun.star.beans.PropertyValue
 args1(0).Name = "Flags"
 args1(0).Value = "A"
 args1(1).Name = "FormulaCommand"
 args1(1).Value = 3
 args1(2).Name = "SkipEmptyCells"
 args1(2).Value = false
 args1(3).Name = "Transpose"
 args1(3).Value = false
 args1(4).Name = "AsLink"
 args1(4).Value = false
 args1(5).Name = "MoveMode"
 args1(5).Value = 4

 dispatcher.executeDispatch(document, ".uno:InsertContents", "", 0, args1())
 end sub
More detail on recording macros is provided in Chapter 13 (Getting Started with Macros) in the Getting Started guide; we recommend you read it if you have not already done so. More detail is also provided in the following sections, but not as related to recording macros.
| Content on this page is licensed under the Creative Common Attribution 3.0 license (CC-BY). |
