Speeding up data entry
Entering data into a spreadsheet can be very labor-intensive, but Calc provides several tools for removing some of the drudgery from input.
The most basic ability is to drop and drag the contents of one cell to another with a mouse. However, Calc also includes several other tools for automating input, especially of repetitive material. They include the Fill tool, selection lists, and the ability to input information into multiple sheets of the same document.
Contents
Using the Fill tool on cells
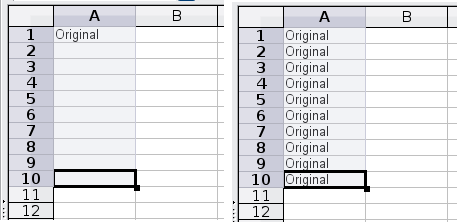
At its simplest, the Fill tool is a way to duplicate existing content. Start by selecting the cell to copy, then drag the mouse in any direction (or hold down the Shift key and click in the last cell you want to fill), and then choose Edit > Fill and the direction in which you want to copy: Up, Down, Left or Right.
| Choices that are not available are grayed out, but you can still choose the opposite direction from what you intend, which could cause you to overwrite cells accidentally unless you are careful. |
Using a fill series
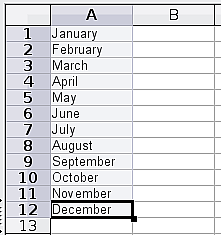
A more complex use of the Fill tool is to use a fill series. The default lists are for the full and abbreviated days of the week and the months of the year, but you can create your own lists as well.
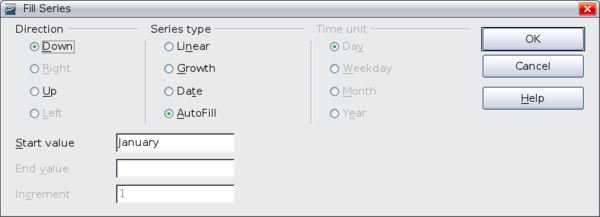
To add a fill series to a spreadsheet, select the cells to fill, choose Edit > Fill > Series. In the Fill Series dialog, select AutoFill as the Series type, and enter as the Start value an item from any defined series. The selected cells then fill in the other items on the list sequentially, repeating from the top of the list when they reach the end of the list.
You can also use Edit > Fill > Series to create a one-time fill series for numbers by entering the start and end values and the increment. For example, if you entered start and end values of 1 and 7 with an increment of 2, you would get the sequence of 1, 3, 5, 7.
In all these cases, the Fill tool creates only a momentary connection between the cells. Once they are filled, the cells have no further connection with one another.
Defining a fill series
To define a fill series, go to Tools > Options > OpenOffice.org Calc > Sort Lists. This dialog shows the previously-defined series in the Lists box on the left, and the contents of the highlighted list in the Entries box.
Click New. The Entries box is cleared. Type the series for the new list in the Entries box (one entry per line), and then click Add.
Using selection lists
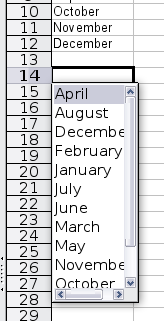
Selection lists are available only for text, and are limited to using only text that has already been entered in the same column.
To use a selection list, select a blank cell and press Ctrl+D. A drop-down list appears of any cell in the same column that either has at least one text character or whose format is defined as Text. Click on the entry you require.
Using the DataForm extension
DataForm is an OpenOffice.org Calc extension that provides a form-like interface designed to make entering and finding spreadsheet data easier.
You can install DataForm, like any extension, from Tools > Extension Manager. Unlike many extensions, it does not require Java.
To use DataForm, you must organize your data in columns with headers or labels in their top rows. Once you have the headers, you can click anywhere on the table or on a blank row directly beneath them and select Data > Form from the menu to open the DataForm input dialog.
DataForm assumes that the first row in each column is a header, and that each row in the table is one record. The dialog provides input fields for each column. Use the New button to add a new record and the Delete button to remove the current one.
At the time of writing (May 2009), the extension was at version 0.9. It is quite useful for basic data entry, but it does have a few limitations. For example, new entries are not added to the table until you move on to another operation. When you do, each new entry is added to the first blank row in the table—generally the one below the last entry. You must select Data > Sort from Calc’s main menu to organize entries when you are done adding them.
A record deleted using DataForm cannot be restored by Calc’s Undo feature. DataForm does have a Restore button that presumably will someday undo a deletion, but it is grayed out in the current version. For now, if you accidentally delete an item, your only option to recover it is to close the file without saving it. Of course, that means you lose any other changes you’ve made to the file since the last save.
DataForm also has a limited search capacity. The Find Prev and Find Next buttons help you move sequentially through the table. If you need to jump about, you can do searches on any column (or combination of columns) with the aid of the Criteria button. For example, the Addresses list shown in our example contains addresses in several countries. To find entries for the state of Western Australia (abbreviated WA), click the Criteria button and enter WA in the state field and A (for Australia) in the country field (so you don’t also find the addresses in the state of Washington in the USA). Click Find Next or Find Prev to jump to each entry that meets those criteria. If you are searching extensively, you might consider closing DataForm and using Calc’s general search tool (Edit > Find & Replace).
Sharing content between sheets
You might want to enter the same information in the same cell on multiple sheets, for example to set up standard listings for a group of individuals or organizations. Instead of entering the list on each sheet individually, you can enter it in all the sheets at once. To do this, select all the sheets, then enter the information in the current one.
| Content on this page is licensed under the Creative Common Attribution 3.0 license (CC-BY). |


