Saving spreadsheets
Contents
Saving spreadsheets
Spreadsheets can be saved in the following three ways.
Click File and then select Save (or Save All or Save As).
From the toolbar
Click on the Save button ![]() on the Function bar. If the file has been saved and no subsequent changes have been made, this button is grayed-out and unselectable.
on the Function bar. If the file has been saved and no subsequent changes have been made, this button is grayed-out and unselectable.
From the keyboard
Use the key combination Control+S.
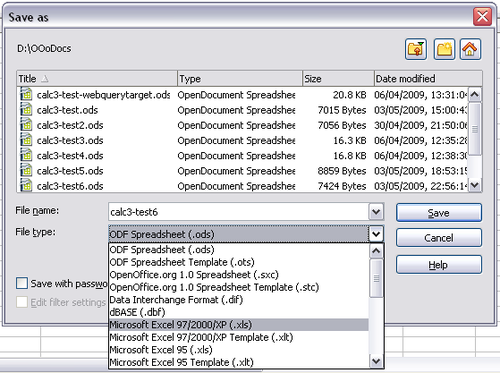
If the spreadsheet has not been saved previously, then each of these actions will open the Save As dialog. Here you can specify the spreadsheet name and the location in which to save it.
Password protection
To protect an entire document from being viewable without a password, use the option on the Save As dialog box to enter a password. This option is only available for files saved in OpenDocument formats or the older OpenOffice.org 1.x formats.
On the Save As dialog box, select the Save with password option, and then click Save. You will receive a prompt to type the same password in two fields. If the passwords match, the OK button becomes active. Click OK to save the document password-protected. If the passwords do not match, you receive the prompt to enter the password again.
| Passwords must contain a minimum of 5 characters. Until you have entered 5 characters, the OK button remains inactive. |
OOo uses a very strong encryption mechanism that makes it almost impossible to recover the contents of a document in case you lose the password.
Saving a document automatically
You can choose to have Calc save your spreadsheet automatically at regular intervals. Automatic saving, like manual saving, overwrites the last saved state of the file. To set up automatic file saving:
- Select Tools > Options > Load/Save > General.
- Click on Save AutoRecovery information every. This enables the box to set the interval. The default value is 30 minutes. Enter the value you want by typing it or by pressing the up or down arrow keys.
Saving as a Microsoft Excel document
If you need to exchange files with users of Microsoft Excel, they may not know how to open and save .ods files. Excel 2007 with Service Pack 2 (SP2) can do this. Users of Excel 2007, 2003, XP, and 2000 can also download and install a free OpenDocument Format (ODF) plugin from Sun Microsystems.
Some users of Microsoft Excel may be unwilling or unable to receive *.ods files. (Perhaps their employer won’t allow them to install the plug-in.) In this case, you can save a document as a Excel file.
- IMPORTANT—First save your spreadsheet in the file format used by OpenOffice.org, *.ods. If you do not, any changes you made since the last time you saved will only appear in the Microsoft Excel version of the document.
- Then click File > Save As.
- On the Save As dialog, in the File type (or Save as type) drop-down menu, select the type of Excel format you need. Click Save.
Saving as a CSV file
To save a spreadsheet as a comma separated value (CSV) file:
- Choose File > Save As.
- In the File name box, type a name for the file.
- In the File type list, select Text CSV and click Save.
- In the Export of text files dialog, select the options you want. Click OK.
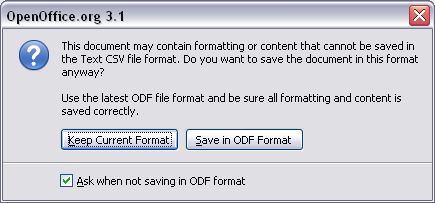
You may see the message box shown below. Click Keep Current Format.
Saving in other formats
Calc can save spreadsheets in a range of formats, including HTML (Web pages), through the Save As dialog. Calc can also export spreadsheets to PDF and XHTML. See Printing, exporting and emailing for more information.
| Content on this page is licensed under the Creative Common Attribution 3.0 license (CC-BY). |


