Choosing options for Calc
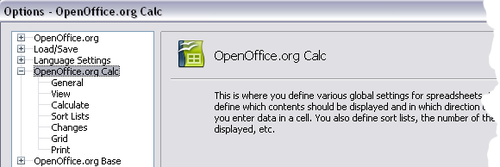
In the Options dialog, click the + sign to the left of OpenOffice.org Calc on the left-hand side. A list of subsections drops down.
Contents
General options for Calc
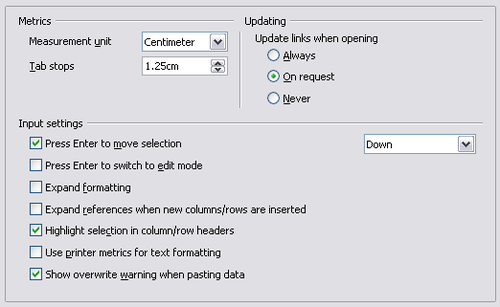
In the Options dialog, choose OpenOffice.org Calc > General.
Metrics section
Choose the unit of measurement used in spreadsheets and the default tab stops distance.
Updating section
Choose whether to update links when opening a document always, only on request, or never. Regardless of this setting, you can manually update links at any time. You might want to avoid updating links when opening documents if they often contain many charts or linked graphics that would slow down loading.
Input settings section
Press Enter to move selection
Specifies that pressing Enter moves the cursor to another cell. If this option is selected, you can also choose the direction the cursor moves: up, down, left, or right. If this option is not selected, pressing Enter completes data entry for a cell but does not move the cursor.
Press Enter to switch to edit mode
Specifies that pressing Enter puts the selected cell into edit mode.
Expand formatting
Specifies whether to automatically apply the formatting attributes of an inserted cell to empty adjacent cells. If, for example, an inserted cell has the bold attribute, this attribute will also apply to empty adjacent cells. However, cells that already have a special format will not be modified by this function. To see the affected range, press Ctrl+* (multiplication sign on the number pad). The format will also apply to all new values inserted within this range.
Expand references when new columns/rows are inserted
Specifies whether to expand references when inserting columns or rows adjacent to the reference range. This is only possible if the reference range, where the column or row is inserted, originally spanned at least two cells in the desired direction.
Example: If the range A1:B1 is referenced in a formula and you insert a new column after column B, the reference is expanded to A1:C1. If the range A1:B1 is referenced and a new row is inserted under row 1, the reference is not expanded, since there is only a single cell in the vertical direction.
If you insert rows or columns in the middle of a reference area, the reference is always expanded.
Highlight selection in column/row headings
Specifies whether to highlight column and row headers in the selected columns or rows.
Use printer metrics for text formatting
Specifies that printer metrics are applied for printing and also for formatting the display on the screen. If this option is not selected, a printer-independent layout is used for screen display and printing.
Show overwrite warning when pasting data
Specifies that, when you paste cells from the clipboard to a cell range that is not empty, a warning appears.
View options for Calc
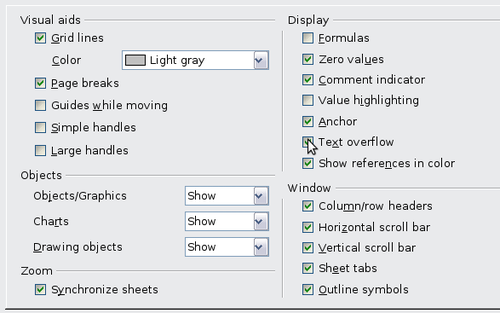
In the Options dialog, choose OpenOffice.org Calc > View.
Visual aids section
Specifies which lines are displayed.
Grid lines
Specifies whether to display grid lines between the cells when viewed onscreen. If this option is selected, you can also specify the color for the grid lines in the current document. The color choice overrides the selection made in Tools > Options > OpenOffice.org > Appearance > Spreadsheet > Grid lines.
For printing, choose Format > Page > Sheet and mark the Grid option.
Page breaks
Specifies whether to view the page breaks within a defined print area.
Guides while moving
Specifies whether to view guides when moving drawings, frames, graphics and other objects. These guides help you align objects.
Simple handles
Specifies whether to display the handles (the eight points on a selection box) as simple squares without a 3D effect.
Large handles
Specifies that larger than normal handles (the eight points on a selection box) are displayed.
Display section
Select various options for the screen display.
Formulas
Specifies whether to show formulas instead of results in the cells.
Zero values
Specifies whether to show numbers with the value of 0.
Comment indicator
Specifies that a small rectangle is shown in the top right corner of the cell when a comment exists for that cell. The text of the comment is shown when you hover the pointer over the cell, if tips are enabled under Tools > Options > OpenOffice.org > General.
To display a comment permanently, right-click on the cell and select Show Comment from the context menu.
Value highlighting
Select this option to highlight all values in the sheet. Text is highlighted in black; numbers in blue; and formulas, logical values, dates, and so on, in green.
When this command is active, any colors assigned in the document are not displayed.
Anchor
Specifies whether the anchor icon is displayed when an inserted object, such as a graphic, is selected.
Text overflow
If a cell contains text that is wider than the width of the cell, the text is displayed over empty neighboring cells in the same row. If there is no empty neighboring cell, a small triangle at the cell border indicates that the text continues.
Show references in color
Specifies that each reference is highlighted in color in the formula. The cell range is also enclosed by a colored border as soon as the cell containing the reference is selected for editing.
Objects section
Specifes whether to display or hide objects in three object groups: objects and graphics; charts; and drawing objects.
Window section
Specifies whether some elements are visible onscreen: column/row headers, horizontal scrollbar, vertical scrollbar, sheet tabs, and outline symbols.
If the Sheet tabs option is not selected, you can only switch between the sheets by using the Navigator.
Note that there is a slider between the horizontal scrollbar and the sheet tabs that may be set to one end.
Zoom section
Select the Synchronize sheets option to apply any selected zoom factor to all sheets in the spreadsheet. If this option is not selected, separate zoom factors can be applied to individual sheets.
Calculate options
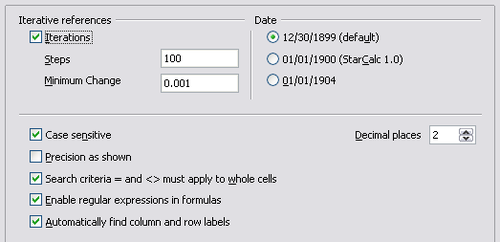
In the Options dialog, choose OpenOffice.org Calc > Calculate.
Use this page to define the calculation settings for spreadsheets.
Iterative references section
Iterative references are formulas that are continuously repeated until the problem is solved. In this section you can choose the number of approximation steps carried out during iterative calculations and the degree of precision of the answer.
Iterations
Select this option to enable iterations. If this options is not selected, an iterative reference causes an error message.
Steps
Sets the maximum number of iteration steps.
Minimum Change
Specifies the difference between two consecutive iteration step results. If the result of the iteration is lower than the minimum change value, then the iteration will stop.
Date section
Select the start date for the internal conversion from days to numbers.
12/30/1899 (default)
Sets 12/30/1899 as day zero.
01/01/1900 (StarCalc 1.0)
Sets 1/1/1900 as day zero. Use this setting for StarCalc 1.0 spreadsheets containing date entries.
01/01/1904
Sets 1/1/1904 as day zero. Use this setting for spreadsheets that are imported in a foreign format.
Other options
Specify a variety of options relevant to spreadsheet calculation.
Case sensitive
Specifies whether to distinguish between upper and lower case in texts when comparing cell contents. The EXACT text function is always case-sensitive, independent of the settings in this dialog.
Decimal places
Defines the number of decimals to be displayed for numbers with the Standard number format. The numbers are displayed as rounded numbers, but are not saved as rounded numbers.
Precision as shown
Specifies whether to make calculations using the rounded values displayed in the sheet. Charts will be shown with the displayed values. If this option is not selected, the displayed numbers are rounded, but they are calculated internally using the non-rounded number.
Search criteria = and <> must apply to whole cells
Specifies that the search criteria you set for the Calc database functions must match the whole cell exactly. When this option is selected, Calc behaves exactly like MS Excel when searching cells in the database functions.
| This search: | Has this result: |
| win | Finds win, but not win95, os2win, or upwind |
| win.* | Finds win and win95, but not os2win or upwind |
| .*win | Finds win and os2win, but not win95 or upwind |
| .*win.* | Finds win, win95, os2win, and upwind |
If this option is not selected, the win search pattern acts like .*win.* —the search pattern can be at any position within the cell when searching with the Calc database functions.
Enable regular expressions in formulas
Specifies that regular expressions are enabled when searching and also for character string comparisons. This relates to the database functions, and to VLOOKUP, HLOOKUP and SEARCH.
Automatically find column and row labels
Specifies that you can use the text in any cell as a label for the column below the text or the row to the right of the text. The text must consist of at least one word and must not contain any operators.
Example: Cell E5 contains the text Europe. Below, in cell E6, is the value 100 and in cell E7 the value 200. If the Automatically find column and row labels option is selected, you can write the following formula in cell A1: =SUM(Europe).
Sort Lists options
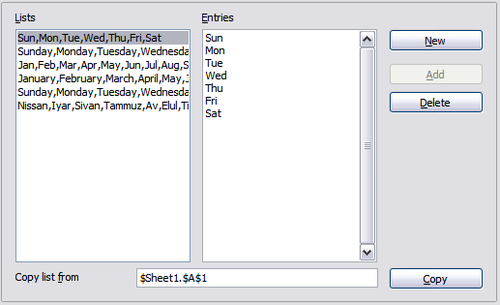
In the Options dialog, choose OpenOffice.org Calc > Sort Lists. Sort lists are used for more than sorting, for example filling a series of cells during data entry. In addition to the supplied lists, you can define and edit your own lists, as described in Defining a fill series.
Changes options
In the Options dialog, choose OpenOffice.org Calc > Changes.
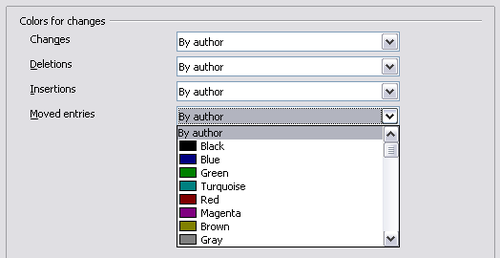
On this page you can specify options for highlighting recorded changes in spreadsheets. You can assign specific colors for insertions, deletions, and other changes, or you can let Calc assign colors based on the author of the change; in the latter case, one color will apply to all changes made by that author.
Grid options
The Grid page defines the grid settings for spreadsheets. Using a grid helps you determine the exact position of any charts or other objects you may add to a spreadsheet. You can also set this grid in line with the snap grid.
If you have activated the snap grid but wish to move or create individual objects without snap positions, you can press the Ctrl key to deactivate the snap grid for as long as needed.
In the Options dialog, choose OpenOffice.org Calc > Grid.
Grid section
Snap to grid activates the snap function.
Visible grid displays grid points on the screen. These points are not printed.
Resolution section
Here you can set the unit of distance for the spacing between horizontal and vertical grid points and subdivisions (intermediate points) of the grid.
Synchronize axes changes the current grid settings symmetrically.
Print options
In the Options dialog, choose OpenOffice.org Calc > Print. See Printing, Exporting, and E-mailing for more about the options on this page.
| Content on this page is licensed under the Creative Common Attribution 3.0 license (CC-BY). |
