Difference between revisions of "Documentation/How Tos/First Steps in Impress2"
(→Exporting Your File as HTML-File) |
(→Exporting Your Presentation as PDF-File) |
||
| Line 367: | Line 367: | ||
Leave the preinstalled settings as they are and use the color scheme of your document. Alternatively, you can use the settings of your browser or other - quite different settings - as you like. If you want to choose your own settings, you can do this with the buttons '''"Text",''' '''"Hyperlink"''' and so on by entering different colors. When you have entered everything, then click on the '''"Create"''' button. The export of your presentation is finished and you can look at it with a browser. | Leave the preinstalled settings as they are and use the color scheme of your document. Alternatively, you can use the settings of your browser or other - quite different settings - as you like. If you want to choose your own settings, you can do this with the buttons '''"Text",''' '''"Hyperlink"''' and so on by entering different colors. When you have entered everything, then click on the '''"Create"''' button. The export of your presentation is finished and you can look at it with a browser. | ||
| − | = Exporting Your Presentation as PDF-File = | + | = Exporting Your Presentation as a PDF-File = |
| − | Since version 1.1 of OpenOffice.org, it | + | Since version 1.1 of OpenOffice.org, it has been possible to save (export) a file directly as a PDF file. You need no other program for creating these files. You only have to click the button [[Image:impress_button_pdf.png]] in the menu bar. Alternatively, you can choose '''File > Export as PDF'''. |
| − | {{Documentation/Tip|This way has the advantage, that you can manipulate the quality | + | {{Documentation/Tip|This way has the advantage, that you can manipulate the quality of the created file.}} |
| − | The following dialog | + | The following dialog appears: |
| + | [[Image:Impress_dialog_export_to_pdf.png|frame|none|'''Figure 22:''' dialog PDF options]] | ||
| − | + | In the first tab you can choose, which slides should be exported (all, special pages...), and you can select the quality level of your graphics. In the lower part of the window, you can determine, if the notes should be added too, and if a "tagged" PDF file will be created. A tagged PDF file has some advantages: If you use this file on the Internet, the beginning will be shown, while the rest of the file will be downloaded. Additionally, hyperlinks have the same function in the PDF file as in the original document. In the tab „User Interface“ you get settings for animations, to transfer the transitions of the slides to the PDF file. | |
| − | + | ||
| − | In the first | + | |
| − | + | ||
| − | + | ||
| − | + | ||
| − | + | ||
| + | If you have made your selections, click on '''"Export"''' and a new dialog appears. In this dialog you have to enter a name for the file and the directory, where it should be saved. Apply your entries by clicking the '''"Export"''' button and OpenOffice.org creates the PDF file. | ||
| + | {{Documentation/Tip|In former versions of OpenOffice.org the dialogs were in another order. The file dialog was the first step. If you cancelled the creation of the file in this first step, you probably had to delete the empty PDF file, which Impress already had created.}} | ||
= Feedback = | = Feedback = | ||
Revision as of 09:35, 29 September 2009
Template:Documentation/NeedsRework
These instructions will give you an overview over the possibilities of "Impress“ explained with a small and easy example. It is provided that you have minor experiences with the handling of your computer and your operating system (for example Windows ®, Linux with the graphical environment (X11)). It is not possible to describe all menus in detail. If you need assistance with the setup of OpenOffice.org, take a look at the "Getting Started-Guides“ or "First Steps in OpenOffice.org Writer“.
If you want to re-do the given example, you will need about one hour. After this training you will be able to create a new presentation with OpenOffice.org Impress.
It is not possible to offer guidelines about how to form a "good“ presentation. This would be too much for this document.
Contents
- 1 Starting Your First Presentation
- 2 Introduction to the Impress Main Window
- 3 Drawing up Your First Presentation
- 4 Effects
- 5 Background and Background Color
- 6 Saving
- 7 Notes
- 8 Handouts
- 9 Printing
- 10 Presenting Your Slide Show
- 11 Exporting Your File as HTML-File
- 12 Exporting Your Presentation as a PDF-File
- 13 Feedback
- 14 Acknowledgments
- 15 Modifications and Updates
Starting Your First Presentation
Start the program by selecting Presentation in the group OpenOffice.org (or OpenOffice.org Impress under Linux/KDE) in the start-menu.
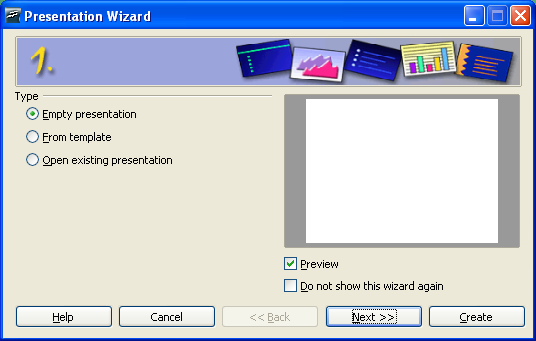
The assistant of OpenOffice.org Impress appears to help you create the basis of your presentation with only a few mouse clicks.
Since you have not yet created a presentation choose "Empty presentation“. Later on you can select your own presentations and patterns.
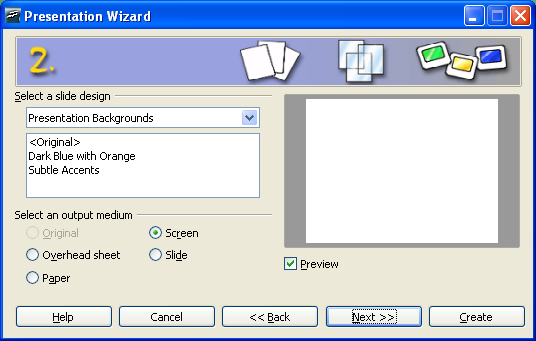
Click "Next“. The next dialogue appears:
Here, you decide for which medium you want to create your presentation (paper, screen...). For the beginning choose "screen“. Assume the pre-installed setting with "Next“.
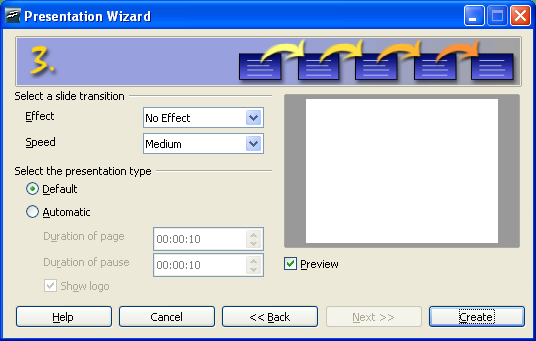
During the third step you can choose how to change from one slide to the next.
For example, you can determine, whether the content of your slide will be changed through overlaying from the left side... Take a look at the options.
In the second drop-down-menu you can choose how fast the change will happen.
In the last selection you can automate your presentation (change of the portrayal or the slides after a fixed time).
For the beginning, you should use the standard presentation. For this click – without any changes – "Create“.
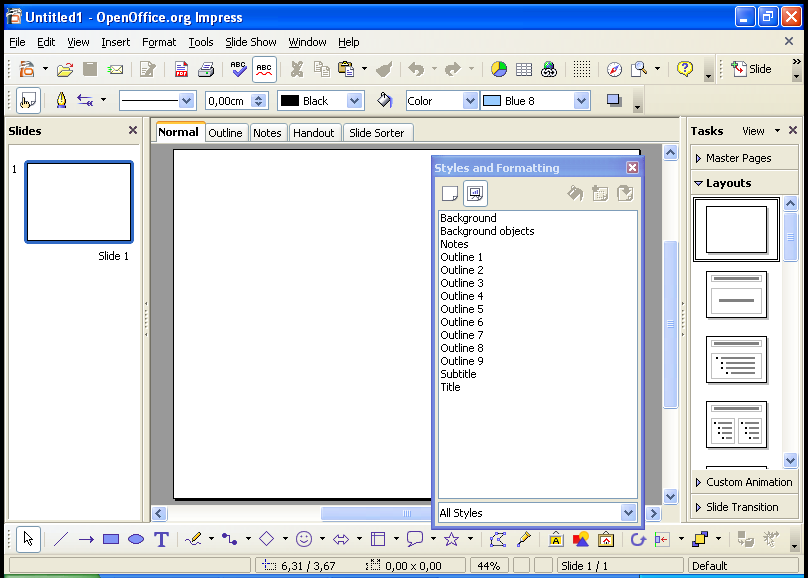
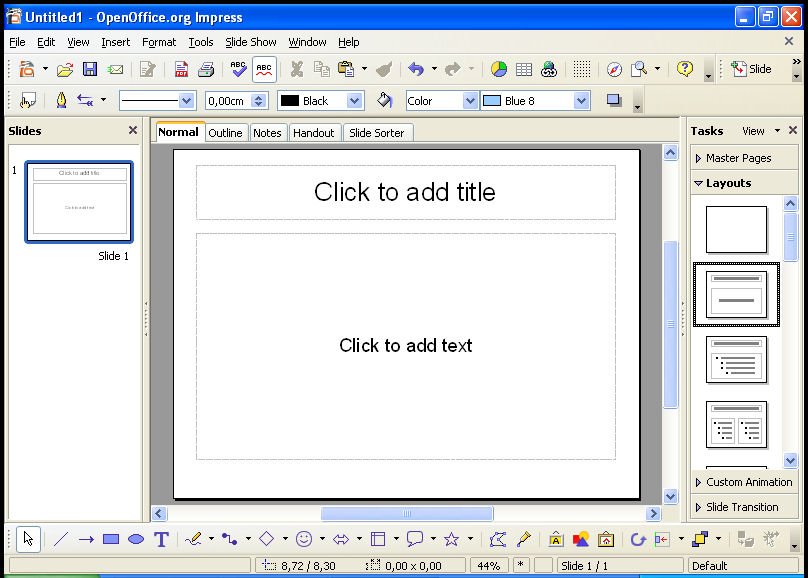
After you have clicked "Create", you will see the main window of OpenOffice.org Impress with its three parts. In the middle of the window is the work space, the main design area of the application.
On the left side of the window you find the Slides pane. In this pane you find thumbnails of all slides in your presentation. They are in the order, that you have chosen. If you want to change the order, you can do it here. Click on a slide and, with the left mouse button pressed, drag it to the new place and release the mouse button.
On the right side you see the floating Styles and Formatting window. To open/close this window press <F11> or choose Format > Styles and Formatting.
To the right of the work space you find the Tasks pane. Figure 4 shows the part "Layouts" opened. Here, you can select different templates with the following fields in different combinations:
- title,
- text,
- clipart
- table,
- diagram
- object.
If you look at all layout variants, you see that all convenient combinations are there. A short help tip is shown when you move your mouse-pointer over the different layouts.
For your first presentation start with the Title Slide containing fields for title and text. Click on the corresponding layout symbol. Your empty slide will change to the new layout.
Before you start working on your first presentation, you should acquaint yourself with the main window elements.
If you do not need this information, leave this chapter and continue with Drawing up Your First Presentation.
Introduction to the Impress Main Window
Under the Title bar (which displays the name of your document and the module in use) you find the Menu bar.
Under the Menu bar you find three toolbars:
- the Standard bar,
- the Presentation bar and
- the Line and Filling bar.
The Menu bar contains the main commands for the presentation.
- In the File menu you find the commands to open, create (new), save, export and print files and to close OpenOffice.org.
- The Edit menu contains commands for the work with your file, like undo, cut, copy, select all, find and replace, the call for the Navigator and duplicate.
- With the commands under the menu View you can change the zoom of your slide representation. You can open the different toolbars, the ruler and the status bar, and you can change the view.
- With the menu Insert you can insert new slides, tables, field commands, graphics and so on.
- The menu Format gives you the possibility to edit the different objects in your presentation. You can change the style of the used lines (continuous, interrupted), the direction of your text (diagonal, vertical), the position (spaces) and the size of characters. Additionally, you can call the slide layout and the Styles and Formatting window.
- In the menu Tools you can start the spellcheck and the hyphenation. Additionally, you will find the Gallery here, with the available graphics. And under Macros you find different entries for recording, managing and running the macros. Furthermore you will find here the entry for the new Media Player. The Media Player allows you to play sound or video objects in your presentation. For the Media Player, the JMF (Java Media Framework) must be installed. In the Tools menu there is also an entry for customizing your working area (shortcuts, menus, toolbars) and another entry with options for the standard adjustments (standard fonts or user data).
- In the Slide Show menu you can start the slide show (with or without stopping the time). And with Slide Show Settings you can select how the slide show will run (start page, style for the mouse pointer). Additionally, you can create animations and you can choose how Impress will react after a mouse click.
- In the Window menu you can navigate between your open documents or open a new window, or close another window.
- The menu Help provides access to the different help functions.
Open the menus and try all the commands. You can retract all your changes regularly in the Edit menu with the Undo command.
The Standard bar gives you access to all functions like Edit File, New presentation, Open file, Save document, Export Directly as PDF (since version 1.1), Print, Cut, Copy and Paste. Additionally, you find here the Undo and Restore arrows. By default, you can take back 100 actions. You can increase or decrease this number in both directions.
In the Standard bar you find the Navigator.
You find the Presentation bar on the right side beneath the Standard bar. That toolbar contains buttons for starting the slide show, accessing the template, and for inserting a new slide. Like other toolbars you can move this toolbar as a floating window to any other place you want. Just click on the left border and drag it where you want (the mouse pointer changes into a cross with 4 arrows).
The Line and filling bar gives you some tools from this part. You will find the button for the Styles and Formatting window.
When needed, context-sensitive toolbars will be shown as floating windows. You can have a look at all toolbars by choosing them in the menu View > Toolbars. Have a look at them and test the different functions. (When you see a check mark in front of the toolbar's name, the toolbar is selected, otherwise it's deselected.)
At the bottom of your window, you find the Drawing bar.
The Drawing bar contains useful resources for quickly inserting different arrangements in your presentation. For example, you find a button for inserting a text field. Select the icon and choose a place for the field, drag and you can insert your text.
You find two buttons for graphical elements plus some drop-down-menus with the most important standard forms, standard symbols, arrows... To learn more about these elements, click on one element. A submenu will be opened with more variations of the different elements. If you leave the mouse pointer a longer time over a button, a short explanation (Help tip) will appear.
Take some time for testing the functions of the toolbars with the following example. You can take all commands back with the Undo arrow, if a command has not the effect, you have expected.
| Small example for testing the toolbars and the "Undo"/"Restore" arrows: |
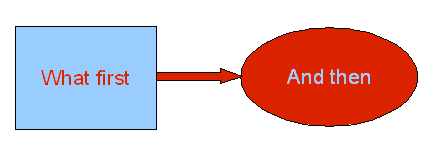
| Click in the lower text field of your presentation. Choose the rectangle in the Drawing bar. Place the rectangle with the mouse in the text field and change the size, so that the rectangle is a quarter of your text field. Choose an ellipse from the Drawing bar and place it on the right side of your text field, change the size. In the Line and Filling bar select another colour for the area of the ellipse (perhaps red).
Click the Line Ends with Arrow button on the Drawing bar. Then click in the middle of the right side of your rectangle, drag your mouse to the left side of the ellipse and release the mouse button. In the Line and Filling bar, you can now choose a colour and a bigger thickness for the arrow. Please note, that the attitude in the Line and Filling bar only is valid for the selected object. You can select an object by clicking on it with the left mouse button. The selection is symbolised through the coloured squares around the object. By clicking on an already selected object, you can move the object to another place. By clicking and pulling with pressed mouse button on these coloured squares you can change the size of the object. After right-clicking an object the context menu will appear, where you have access to different object characteristics. Choose the rectangle and insert the text "What first". Select the text and choose a colour for it in the Line and Filling bar. Click the ellipse and insert the text "And then". Select the text and choose another colour for the fonts. Now you can do some experiments with the Back arrows and take back different steps or make them again. At the end, delete all insertions from this example as a demonstration for the function of the Undo symbols. |
On the upper border of the work space you will find the tabs for the different views. You can activate a work space view by clicking on a tab. OpenOffice.org Impress offers the following views (from left to right):
- Normal view (For drawing),
- Outline view
- Notes view
- Handout view
- Slide Sorter view
Select each of these views.
Drawing up Your First Presentation
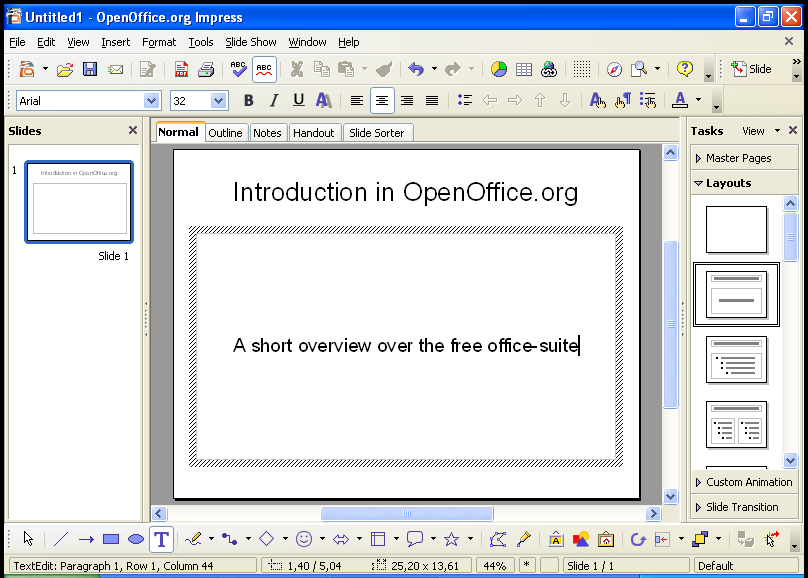
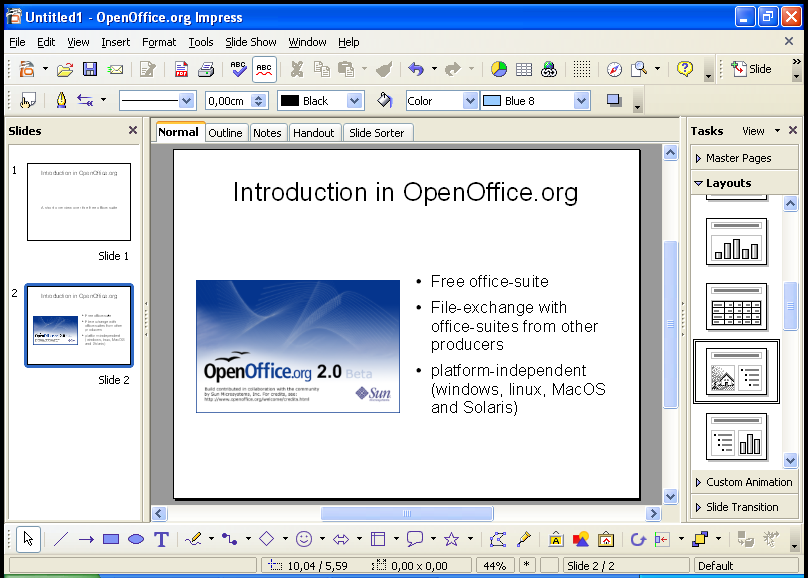
After this short explanation of the Impress main window you continue with your presentation. Change the view to "Normal". On the title page of the first part insert a title for the presentation. For this, click in the upper text field "Insert title by clicking" and insert the text "Introduction in OpenOffice.org". In the lower text field, after clicking, write "A short overview over the free office suite".
Add a new page to your presentation. For this, choose Insert > Slide. A new, empty page, will be added. From the Layouts pane select a layout with title, graphic and bullet text (the quick tip shows "title, clipart, text"). This selection will be used immediately for your new page. Insert the text from the first page.
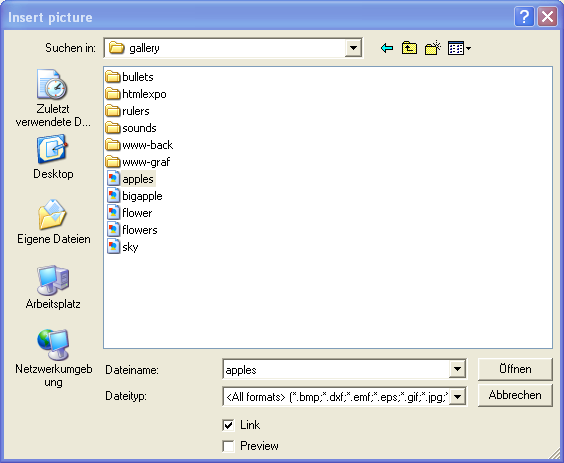
In the lower left half you will insert a graphic. Double-click in this part. In the next dialog choose the image, which you want to insert, and click Open. (The dialog can be different, depending on the used operating system.)
Use the lower right half for a bulleted list:
- free office suite
- file exchange with other office suites
- platform independent (Windows, Linux, MacOS and Solaris)
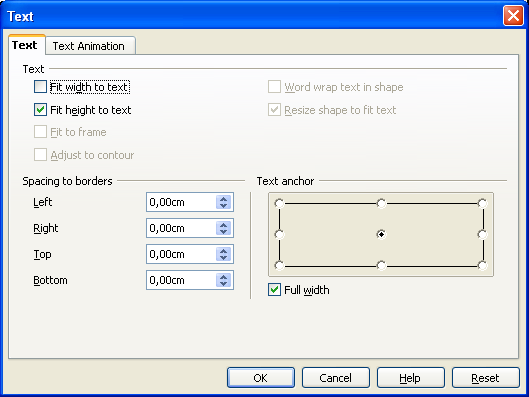
Select the inserted text from your list and change the font size with the Line and Filling bar to 28. Afterwards, right-click the selected text to call the context-menu for further editing.
Select "Text". On this tab you can edit the text on the right.
The result should be as follows:
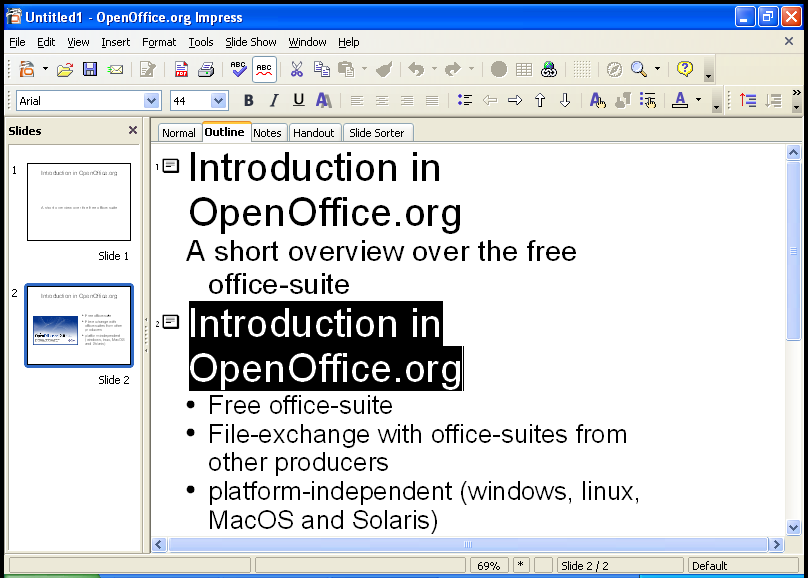
Until now, you have worked in the Normal view of OpenOffice.org Impress. Earlier you have learned about the tabs for the other views. Choose the second tab of the left hand side ("Outline"). You can see now all the slides with the texts:
In this view you can check the contents of your slides. You can insert new outline levels and distribute contents on the different slides.
The Outline view is very helpful for the planning and the arrangement of the content in your presentation.
You can see the result of your changes with a short delay in the Slides pane on the left.
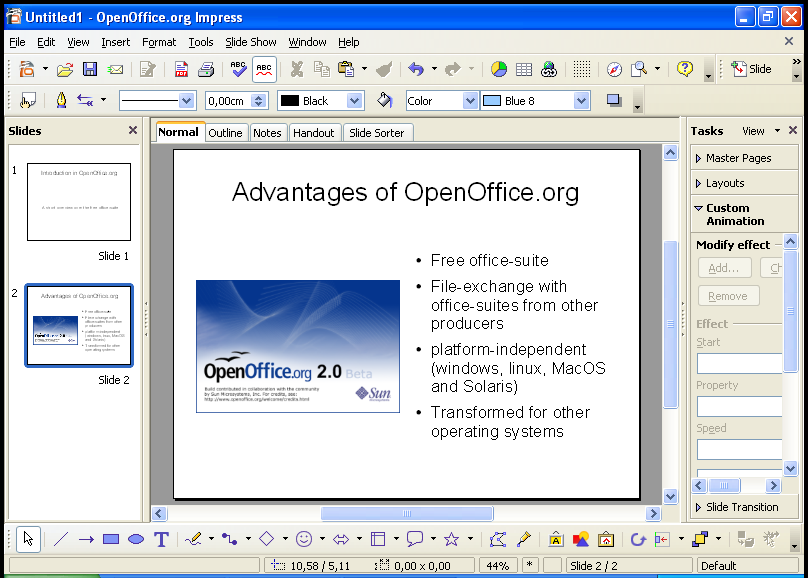
Select the first row of the second slide and replace the text with "Advantages of OpenOffice.org". Go to the end of the last row, press Return and insert "Transformed for other operating systems". On your second slide a new point appears.
Place your mouse pointer behind the title of your second slide and press the Return key. A new slide (number 3) appears. The bullet points will be moved to slide 3. With the Backspace key you can take back the changes. The bullet points are on slide 2 again.
Repeat the creation of a new slide. But now, press the <Tab> key instead of the Return key. The new slide disappears. On the second slide there is only one bullet point at the beginning. This point can be deleted with the <Backspace> key.
As you see, changes can be done easily in the Outline view.
Effects
Change back to the Normal view.
In the Slides pane on the left side choose slide 1 of your presentation.
Select the (lower) text field.
In the Task pane on the right side open "Custom Animation". When you press the "Add" button a dialogue appears, where you can choose different effects for the slides. In the "Entrance" tab you will find elements for the appearance of the text fields on the slide. In the "Exit" tab you will find effects for the disappearance of the text fields. You can choose the different effects from a list. The effects are sorted in categories by the reaction of the audience. In another tab you will find paths of animations, which means that different effects are combined. In the lower part of the dialogue you can adjust the speed of the animations. When you have checked "Automatic preview" you can see how your presentation is working.
When you press the "OK" button, you will see a list with the selected animations in the Task pane. From this list you can choose an entry as animation for your objects. The name of this animation is written in bold above the part with the adjustments for this entry. Changes can be made for the kind of starting the effect (with mouse click), for the direction (from outside to inside) or the speed.
With the arrow keys below the list field you can change the order of the effects. If you want to delete an effect from this list, you can do this with the context-menu (right-click with the mouse) or by pressing the "Delete" key, when the entry is selected.
You can add sounds for the change from one slide to the next. You find them – like the optical animations – in the part "Slide Transition" in the Task pane. You can select the optical and acoustical animation styles from a list.
Similar to the optical user defined effects you can choose the speed for the effect, the action, which starts the effect. When you choose a sound, you can determine that the sound should be repeated.
Furthermore, you can choose, if the selected animation is valid only for this slide or for all slides.
If you have chosen a sound for the slide transition, you can reach the dialogue through the list entry "Other sound...". A new dialogue for the selection of the sound file will appear.
Background and Background Color
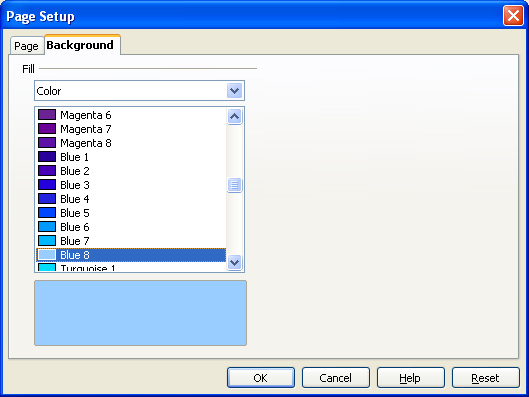
As a next step, you can add a background color. Place your mouse pointer on your slide and call the menu Format > Page.
In the opening window you can select the background color for your slide in the "Background" tab.
You can choose between plain color, color gradient, hatching or bitmap. Look at all possibilities and test them with your presentation.
You have been asked about the selection of the background, if the background settings are valid for all slides. You can change (fast and simple) the settings for all slides of your presentation (master function).
If you want to create a special background (for example using a graphic or a logo) choose View > Master > Slide Master to open the master view of the slides. Now choose Insert > Picture > From File to select the image you want to insert. Confirm your selection with the "Open" button. Select the image and call for the context-menu (click with the right mouse-button). Choose Position and Size. In the following dialog you can change the size and the alignment of your graphic.
Eventually, you will have to go to the context-menu arrangement and put your graphic in the right level (maybe in the level behind the text boxes).
In the slide master view you can change the text styles of the outline texts and the colors. Leave the slide master view by clicking on the button "Close master view" in the Master View bar.
Saving
You can save your presentation with File > Save or by clicking on the "Save" button (disk symbol). You can also use the menu File > Save as... and define a path.
You can save your presentation as a template for using it as a base for your next presentation.
When you know the path, choose File > Save as, select the correct directory, give it an easy-to-know name without file extension and in the "File type" list select "OpenDocument Presentation Template" (or the format of the older version: OpenOffice.org 1.0 Presentation Template).
When you start OpenOffice.org for the next time, choose File > Templates > Organize. In the left window, after a double-click on "My Templates", you can see your saved template. After closing this dialog, you can use the wizard for creating a new presentation. Now you will find your own template under step 1 if you select "My Templates".
Notes
You can make some notes for your presentation quite easy. Choose the Notes tab in the work space. You will see an added notes area in your slide, where you can write down some headwords or your lecture text.
When you print your presentation, you can choose, if this part will be printed too or not.
Handouts
In the Handout view you can check, how the documents for the listeners look like. If you prefer another sharing out of the slides, you can change the Layout in the Task pane on the right side. This selection is used after a mouse click for all pages of the handout.
Printing
If you want to print your presentation directly, you can click the Printer button (printer symbol) in the Standard bar. Special adjustments can be done in the menu File > Print.
Here you can define if all pages should be printed, or only individual pages.
When you click the Options button a dialog box will appear, where you can define, that notes or handouts should be printed too.
Presenting Your Slide Show
Open your presentation with File > Open. Start the slide show with the menu Slide show > Slide show or with the button in the Presentation bar. Alternatively, you can start the slide show with the function key <F5> .
Template:Documentation/Windows
After a short moment, the first slide of your presentation will appear. If you did not choose an automatic change to the next slide, you can reach the next slide by clicking with the left mouse button or by pressing the space-bar.
If you want to go back to the previous slide, press the right mouse button. You can also use the arrow keys for browsing fast back or forward.
If you want to browse to a slide, which is near the end (while you are just starting), you can use the Navigator. For calling the Navigator, press <shift> + <F5> (until version 1.1 only the function key <F5>). In the Standard bar click the button with the compass. The Navigator appears on your actual slide.
In the Navigator window you can click the slide you want to go to, or you can browse with the arrow keys on the upper border of the window. If you double-click a slide, this slide will be shown immediately in the work space.
With the <ESC> key you can cancel your presentation at any time.
Exporting Your File as HTML-File
You want to show your presentation with internet techniques. This may be necessary, when the computer, which you are using for the presentation, has no OpenOffice.org installed.
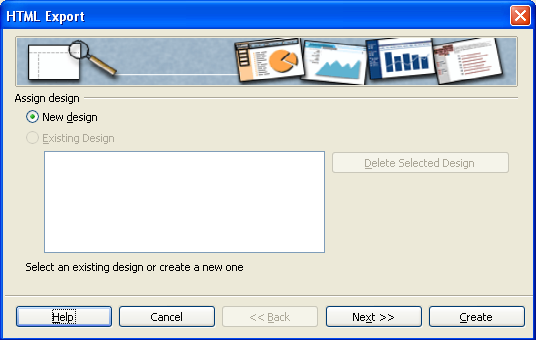
For this, choose File > Export. A dialog will be opened, where you can insert the file name and the directory for saving the file. As file extension "HTML-document (OpenOffice.org Impress)" is preselected. The extension HTML will be added automatically (if you have not deselected the automatic file extension). When you click on "Export", the next dialog will appear.
When you open this dialog for the first time, there is no "Existing design", so you have to add a "New design", which you can use for other presentations as well. Leave the preinstalled settings as they are and click "Next". The following dialog will appear:
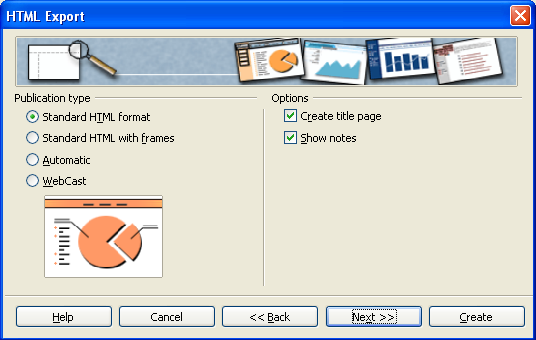
On the left hand side you can choose how your HTML code should look like. Leave the preinstalled settings as they are.
On the right side you should ask OpenOffice.org to create a title page (index file). Deselect "Show notes". If you do not deselect them, then on each page a note area will be added. But this is not needed for your presentation. Click "Next" and a new dialog will appear.
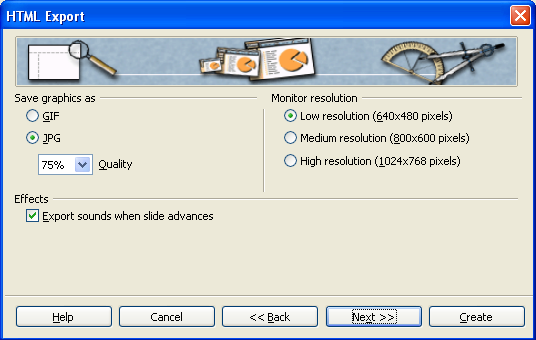
Here you can choose, in which format (gif or jpg) your graphics will be saved and how strong they will be compressed (only possible, if you choose jpg). On the right side you can enter the screen resolution for your presentation. Choose "Medium resolution". In the lower part of the window, you can select or deselect, if sounds should be used when the slides are changing. Press the "Next" button and the next dialog box will appear:
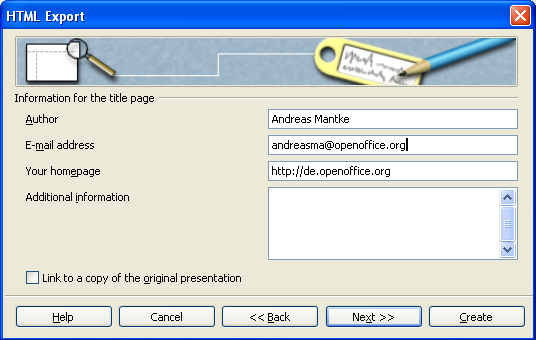
Here you can enter your personal data and additionally other data for the newly created title page. By clicking the "Next" button you reach the following dialog.
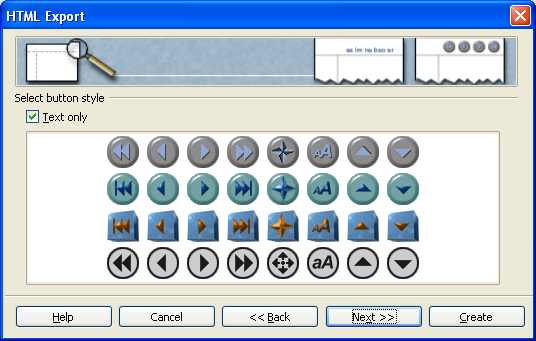
Here you can choose a button set for your presentation. Deselect "Text only" and apply your choice by clicking the "Next" button. Now you can choose the color scheme for your document.
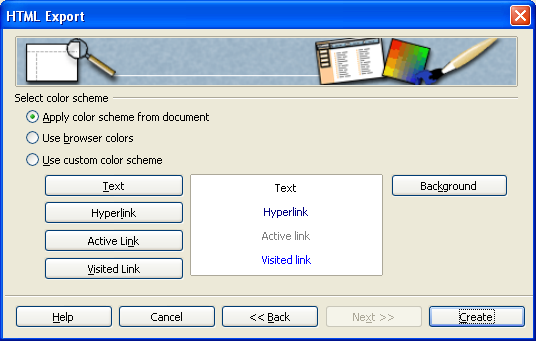
Leave the preinstalled settings as they are and use the color scheme of your document. Alternatively, you can use the settings of your browser or other - quite different settings - as you like. If you want to choose your own settings, you can do this with the buttons "Text", "Hyperlink" and so on by entering different colors. When you have entered everything, then click on the "Create" button. The export of your presentation is finished and you can look at it with a browser.
Exporting Your Presentation as a PDF-File
Since version 1.1 of OpenOffice.org, it has been possible to save (export) a file directly as a PDF file. You need no other program for creating these files. You only have to click the button ![]() in the menu bar. Alternatively, you can choose File > Export as PDF.
in the menu bar. Alternatively, you can choose File > Export as PDF.
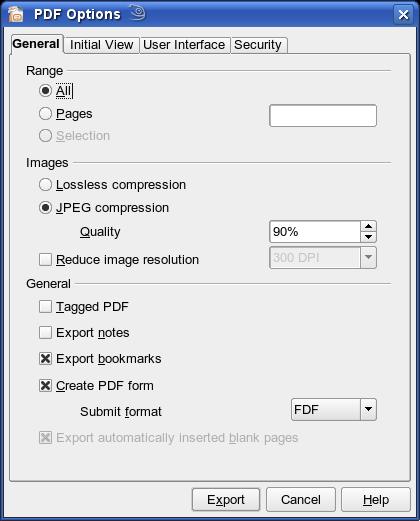
The following dialog appears:
In the first tab you can choose, which slides should be exported (all, special pages...), and you can select the quality level of your graphics. In the lower part of the window, you can determine, if the notes should be added too, and if a "tagged" PDF file will be created. A tagged PDF file has some advantages: If you use this file on the Internet, the beginning will be shown, while the rest of the file will be downloaded. Additionally, hyperlinks have the same function in the PDF file as in the original document. In the tab „User Interface“ you get settings for animations, to transfer the transitions of the slides to the PDF file.
If you have made your selections, click on "Export" and a new dialog appears. In this dialog you have to enter a name for the file and the directory, where it should be saved. Apply your entries by clicking the "Export" button and OpenOffice.org creates the PDF file.
Feedback
Please direct any comments or suggestions about this document to:andreasma[at]openoffice.org
Acknowledgments
Initial author: Andreas Mantke
Corrections (of the German version): Klaus Endelmann, Helga Fischer, Michael Kirchner, Michael Scheurer, Thomas Hackert
Version: third (for the German version), first (for the English version)
Last changes::
First translation into English: Sigrid Kronenberger
Modifications and Updates
| |
|
Description of Change |
|---|---|---|
| 0.1 | 042103 | Original-Dokument (german language) by Andreas Mantke (andreasma[at]openoffice.org) |
| 0.2 | 090203 | Update for OpenOffice.org 1.1 (german language) by Andreas Mantke (andreasma[at]openoffice.org) |
| 0.3 | 050805 | Update for OpenOffice.org 2.0 (german language) by Andreas Mantke (andreasma[at]openoffice.org) |
| 0.4 | 061405 | Translation into English by Sigrid Kronenberger (eskroni[at]openoffice.org) |
| 0.5 | 102305 | English screen shots by Andreas Mantke (andreasma[at]openoffice.org) |
| 0.6 | 113005 | Update to Oasis-format by Andreas Mantke (andreasma[at]openoffice.org) |
| 0.7 | 101307 | Move to Wiki and update section export to pdf by Andreas Mantke (andreasma[at]openoffice.org) |
