Difference between revisions of "Documentation/DevGuide/Basic/Adding Event Handlers"
OOoWikiBot (Talk | contribs) m (Robot: Changing Category:Documentation/Developers Guide/Basic and Dialogs) |
|||
| (4 intermediate revisions by 4 users not shown) | |||
| Line 5: | Line 5: | ||
|NextPage=Documentation/DevGuide/Basic/AutoPilot Dialogs | |NextPage=Documentation/DevGuide/Basic/AutoPilot Dialogs | ||
}} | }} | ||
| − | {{DISPLAYTITLE:Adding Event Handlers}} | + | {{Documentation/DevGuideLanguages|Documentation/DevGuide/Basic/{{SUBPAGENAME}}}} |
| − | Now we will write code to open the dialog and add functionality to the buttons. To show a dialog, create a dialog object using < | + | {{DISPLAYTITLE:Adding Event Handlers}} |
| + | Now we will write code to open the dialog and add functionality to the buttons. To show a dialog, create a dialog object using <tt>createUnoDialog()</tt> and call its <tt>execute()</tt> method. A dialog can be closed while it is shown by calling <tt>endExecute()</tt>. | ||
| − | {{ | + | {{Tip|It is possible to configure the '''Finish''' button and the '''Cancel''' button to close the dialog by setting the button property PushButtonType to OK and Cancel respectively. The method <tt>execute()</tt> returns 0 for Cancel and 1 for OK.}} |
| − | To add functionality to GUI elements, develop Subs to handle GUI events, then hook them to the GUI elements. To add functionality to the buttons of our dialog, click the '''Module1''' tab in the lower part of the Basic IDE and enter the following Subs above the previous Sub Main to open, close and process the dialog. Note that a < | + | To add functionality to GUI elements, develop Subs to handle GUI events, then hook them to the GUI elements. To add functionality to the buttons of our dialog, click the '''Module1''' tab in the lower part of the Basic IDE and enter the following Subs above the previous Sub Main to open, close and process the dialog. Note that a <tt>Private</tt> variable <tt>oDialog</tt> is defined outside of the Subs. After loading the dialog, this variable is visible from all Subs and Functions of Module1. |
<!--[SOURCE:BasicAndDialogs/FirstStepsBasic.odt]--> | <!--[SOURCE:BasicAndDialogs/FirstStepsBasic.odt]--> | ||
| − | + | <source lang="oobas"> | |
Private oDialog as Variant ' private, module-wide variable | Private oDialog as Variant ' private, module-wide variable | ||
| Line 54: | Line 55: | ||
... | ... | ||
End Sub | End Sub | ||
| − | + | </source> | |
Select the '''Cancel''' button in our dialog in the dialog editor, and click the '''Events''' tab of the '''Properties Dialog''', then click the ellipsis button on the right-hand side of the Event '''When Initiating'''. As shown in the next illustration the '''Assign Action''' dialog appears. | Select the '''Cancel''' button in our dialog in the dialog editor, and click the '''Events''' tab of the '''Properties Dialog''', then click the ellipsis button on the right-hand side of the Event '''When Initiating'''. As shown in the next illustration the '''Assign Action''' dialog appears. | ||
[[Image:CancelButtonEvent.png|none|thumb|400px|Assign Action dialog]] | [[Image:CancelButtonEvent.png|none|thumb|400px|Assign Action dialog]] | ||
| − | In the '''Assign Action''' dialog press the '''Macro ...''' button to open the '''Macro Selector''' dialog shown in the illustration below. Navigate to < | + | In the '''Assign Action''' dialog press the '''Macro ...''' button to open the '''Macro Selector''' dialog shown in the illustration below. Navigate to <tt>FirstStepsBasic.Standard.Module1</tt>, select the Sub CancelGraphicsDialog and press the '''OK''' button to link this sub to the wizard dialog's '''Cancel''' button. |
[[Image:MacroSelector.png|none|thumb|400px|The Macro Selector dialog]] | [[Image:MacroSelector.png|none|thumb|400px|The Macro Selector dialog]] | ||
| Line 69: | Line 70: | ||
Pressing the '''OK''' button in the Assign Action dialog finishes the assignment process. | Pressing the '''OK''' button in the Assign Action dialog finishes the assignment process. | ||
| − | {{ | + | {{Note|In the '''Assign Action''' dialog there's also a '''Component ...''' button. This button is only needed in the context of dialogs used by UNO components, see [[Documentation/DevGuide/WritingUNO/Accessing Dialogs|Accessing Dialogs]]. In the Basic context this button is not relevant.}} |
| − | Using the same method, hook the Finish button to < | + | Using the same method, hook the Finish button to <tt>FinishGraphicsDialog</tt>. |
{| | {| | ||
Revision as of 19:54, 14 July 2018
Now we will write code to open the dialog and add functionality to the buttons. To show a dialog, create a dialog object using createUnoDialog() and call its execute() method. A dialog can be closed while it is shown by calling endExecute().
To add functionality to GUI elements, develop Subs to handle GUI events, then hook them to the GUI elements. To add functionality to the buttons of our dialog, click the Module1 tab in the lower part of the Basic IDE and enter the following Subs above the previous Sub Main to open, close and process the dialog. Note that a Private variable oDialog is defined outside of the Subs. After loading the dialog, this variable is visible from all Subs and Functions of Module1.
  Private oDialog as Variant ' private, module-wide variable

  Sub RunGraphicsWizard
      oDialog = createUnoDialog(DialogLibraries.Standard.Dialog1)
      oDialog.execute
  End Sub

  Sub CancelGraphicsDialog
      oDialog.endExecute()
  End Sub

  Sub FinishGraphicsDialog
      Dim sFile as String, sGraphicURL as String

      oDialog.endExecute()

      sFile = oDialog.Model.FileControl1.Text

      ' the FileControl contains a system path, we have to transform it to a file URL
      ' We use the built-in Basic runtime function ConvertToURL for this purpose
      sGraphicURL = ConvertToURL(sFile)

      ' insert the graphics
      ' access the document model
      oDoc = ThisComponent
      ' get the Text service of the document
      oText = oDoc.getText()
      ' create an instance of a graphic object using the document service factory
      oGraphicObject = oDoc.createInstance("com.sun.star.text.GraphicObject")
      ' set the URL of the graphic
      oGraphicObject.GraphicURL = sGraphicURL
      ' get the current cursor position in the GUI and create a text cursor from it
      oViewCursor = oDoc.getCurrentController().getViewCursor()
      oCursor = oText.createTextCursorByRange(oViewCursor.getStart())
      ' insert the graphical object at the cursor position
      oText.insertTextContent(oCursor.getStart(), oGraphicObject, false)
  End Sub

  Sub Main
      ...
  End Sub
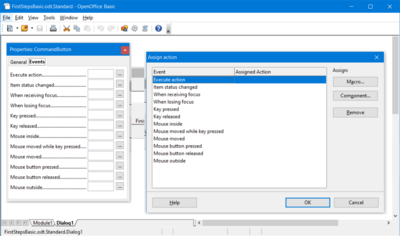
Select the Cancel button in our dialog in the dialog editor, and click the Events tab of the Properties Dialog, then click the ellipsis button on the right-hand side of the Event When Initiating. As shown in the next illustration the Assign Action dialog appears.
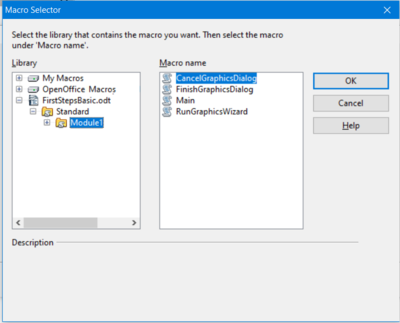
In the Assign Action dialog press the Macro ... button to open the Macro Selector dialog shown in the illustration below. Navigate to FirstStepsBasic.Standard.Module1, select the Sub CancelGraphicsDialog and press the OK button to link this sub to the wizard dialog's Cancel button.
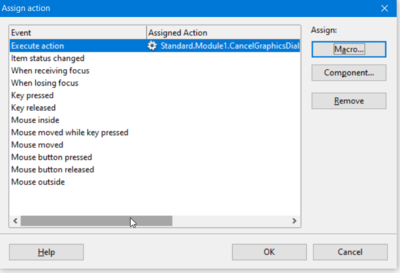
The next illustration shows how the new assignment is shown in the Assign Action dialog.
Pressing the OK button in the Assign Action dialog finishes the assignment process.
| In the Assign Action dialog there's also a Component ... button. This button is only needed in the context of dialogs used by UNO components, see Accessing Dialogs. In the Basic context this button is not relevant. |
Using the same method, hook the Finish button to FinishGraphicsDialog.
| If the Run icon is selected now, the dialog is displayed, and the Finish and Cancel buttons are functional. |
| Content on this page is licensed under the Public Documentation License (PDL). |


