Difference between revisions of "API/Samples/Java/CalcAddin"
| Line 14: | Line 14: | ||
<BR> | <BR> | ||
Select 'File'->'New Project' to bring up the following dialog, then select 'OpenOffice.org Calc Add-in' project type in 'OpenOffice.org' Categories, click 'Next' button to proceed to next step.<BR><BR> | Select 'File'->'New Project' to bring up the following dialog, then select 'OpenOffice.org Calc Add-in' project type in 'OpenOffice.org' Categories, click 'Next' button to proceed to next step.<BR><BR> | ||
| − | [[Image: | + | [[Image:CalcAddinFg1.png]]<BR>Figure 1, choose project type<BR><BR><BR> |
=== Set project details === | === Set project details === | ||
<BR> | <BR> | ||
Set project name and Calc Add-in name as 'CalcAddin',assign this project to 'org.openoffice.sdk.example.Spreadsheet' package, chose the project location where the source code are stored, then click 'Next' to proceed to next step.<BR><BR> | Set project name and Calc Add-in name as 'CalcAddin',assign this project to 'org.openoffice.sdk.example.Spreadsheet' package, chose the project location where the source code are stored, then click 'Next' to proceed to next step.<BR><BR> | ||
| − | [[Image: | + | [[Image:CalcAddinFg2.png]]<BR>Figure 2, Set project details<BR><BR> |
Check 'Create backward compatible Cacl Add-In' option to create extra backward compatible Calc Addin(*.xcs file).<BR><BR><BR> | Check 'Create backward compatible Cacl Add-In' option to create extra backward compatible Calc Addin(*.xcs file).<BR><BR><BR> | ||
| Line 39: | Line 39: | ||
<BR> | <BR> | ||
*Double click Function1 to expand function settings for the first function:<BR> | *Double click Function1 to expand function settings for the first function:<BR> | ||
| − | [[Image: | + | [[Image:CalcAddinFg3.png]]<BR>Figure 3, The first function Name and its type<BR><BR> |
*Set the first Function name as 'getMyFirstValue” | *Set the first Function name as 'getMyFirstValue” | ||
*Set return Type as 'int' | *Set return Type as 'int' | ||
| Line 45: | Line 45: | ||
*Double click parameter0 to configure parameter settings<BR> | *Double click parameter0 to configure parameter settings<BR> | ||
| − | [[Image: | + | [[Image:CalcAddinFg4.png]]<BR> Figure 4, The first function parameter<BR><BR> |
*Set parameter name as 'xOptions', and set type as 'XpropertySet' | *Set parameter name as 'xOptions', and set type as 'XpropertySet' | ||
Finaly, the first function will be like the following figure: | Finaly, the first function will be like the following figure: | ||
| − | [[Image: | + | [[Image:CalcAddinFg5.png]]<BR>Figure 5, The first function setting<BR><BR> |
==== Add the second function – getMySecondValue method ==== | ==== Add the second function – getMySecondValue method ==== | ||
<BR> | <BR> | ||
*click 'Add function' button at top right of dialog<BR><BR> | *click 'Add function' button at top right of dialog<BR><BR> | ||
| − | [[Image: | + | [[Image:CalcAddinFg6.png]]<BR>Figure 6, Add new function<BR><BR> |
*setting function name as 'getMySecondValue'<BR> | *setting function name as 'getMySecondValue'<BR> | ||
*click 'Add parameter' to add one more parameter for the second function<BR> | *click 'Add parameter' to add one more parameter for the second function<BR> | ||
| − | [[Image: | + | [[Image:CalcAddinFg7.png]]<BR>Figure 7, Add new parameter<BR><BR> |
*set parameter0's name as ' xOptions', set it's type as 'XpropertySet'<BR> | *set parameter0's name as ' xOptions', set it's type as 'XpropertySet'<BR> | ||
*set parameter1's name as ' intDummy', set it's type as 'int'<BR> | *set parameter1's name as ' intDummy', set it's type as 'int'<BR> | ||
| − | [[Image: | + | [[Image:CalcAddinFg8.png]]<BR>Figure 8, Configuration completed<BR><BR> |
*Click Finish button to finish the wizards. | *Click Finish button to finish the wizards. | ||
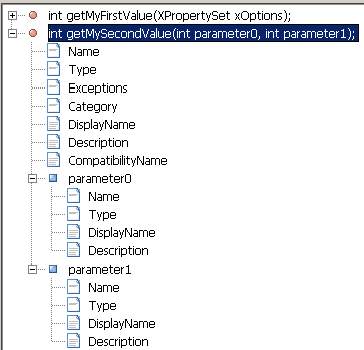
Now, the Calc Add-In project has been created. From project browser, it will be like the following figure: | Now, the Calc Add-In project has been created. From project browser, it will be like the following figure: | ||
| − | [[Image: | + | [[Image:CalcAddinFg9.png]]<BR>Figure 9, Project Browser<BR><BR><BR> |
=== Implement functions === | === Implement functions === | ||
| Line 119: | Line 119: | ||
you may get error message on line 13 like 'cannot find symbol', ignore it. After the first build, the message will not not shown any more. <BR> | you may get error message on line 13 like 'cannot find symbol', ignore it. After the first build, the message will not not shown any more. <BR> | ||
| − | [[Image: | + | [[Image:CalcAddinFg12.png]]<BR>Figure 12, Error message for XCalcAddin<BR><BR><BR> |
=== Deploy and test CalcAddin === | === Deploy and test CalcAddin === | ||
| Line 126: | Line 126: | ||
<BR> | <BR> | ||
Save all changes and 'clear and build' the project, then the addin can be deployed via right click the 'CalcAddin' in the project browser. | Save all changes and 'clear and build' the project, then the addin can be deployed via right click the 'CalcAddin' in the project browser. | ||
| − | [[Image: | + | [[Image:CalcAddinFg13.png]]<BR>Figure 13, Delpoy the Addin<BR><BR> |
Extension manager dialog, the new addin is available to use now:<BR> | Extension manager dialog, the new addin is available to use now:<BR> | ||
| − | [[Image: | + | [[Image:CalcAddinFg14.png]]<BR>Figure 14, Extension manager<BR><BR> |
In the function wizard (Ctrl+F2), these two function could be found in the 'Addin'<BR> | In the function wizard (Ctrl+F2), these two function could be found in the 'Addin'<BR> | ||
| − | [[Image: | + | [[Image:CalcAddinFg15.png]]<BR>Figure 15, Function Wizard<BR><BR> |
==== Testing ==== | ==== Testing ==== | ||
<BR> | <BR> | ||
Go to the example folder'/CalcAddin/test/' to open the 'CalcAddins.ods' file to test these two functions. | Go to the example folder'/CalcAddin/test/' to open the 'CalcAddins.ods' file to test these two functions. | ||
| − | [[Image: | + | [[Image:CalcAddinFg16.png]]<BR>Figure 16, Test Addins<BR><BR> |
Revision as of 08:34, 3 January 2008
Create Calc Addin
2008.01.03
Environment:
Netbeans 5.5.1, OpenOffice.org and OpenOffice.org SDK, OpenOffice.org API plugin for Netbeans
For installation instruction, please visit:
[OpenOffice NetBeans Integration]
This step-by-step illustration shows how to create the sdk example, CalcAddin by using OpenOffice.org API plugin in NetBeans.
Contents
Create a Calc Addin project by using OpenOffice.org API plugin
Select 'File'->'New Project' to bring up the following dialog, then select 'OpenOffice.org Calc Add-in' project type in 'OpenOffice.org' Categories, click 'Next' button to proceed to next step.
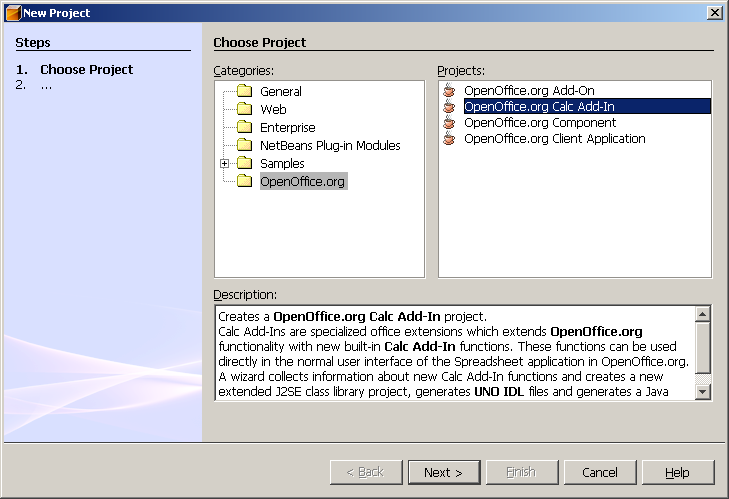
Figure 1, choose project type
Set project details
Set project name and Calc Add-in name as 'CalcAddin',assign this project to 'org.openoffice.sdk.example.Spreadsheet' package, chose the project location where the source code are stored, then click 'Next' to proceed to next step.
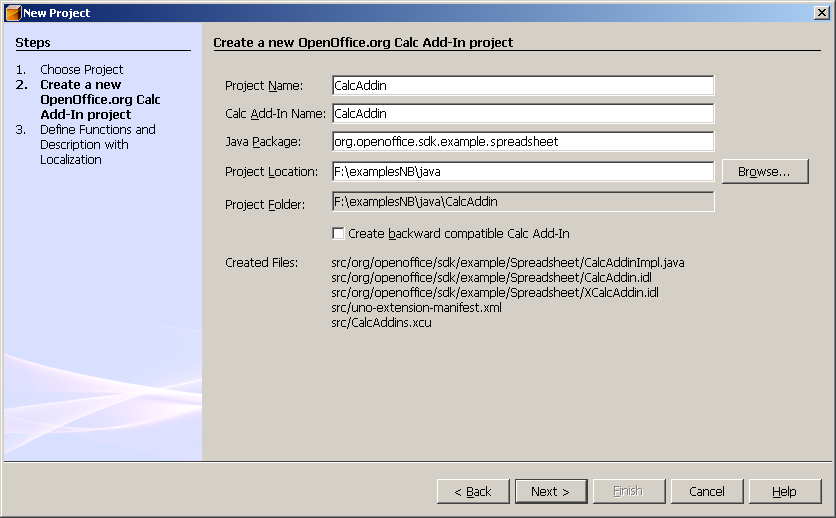
Figure 2, Set project details
Check 'Create backward compatible Cacl Add-In' option to create extra backward compatible Calc Addin(*.xcs file).
Add functions and Parameters
Adding two function for this AddIn.
[java,N]
public int getMyFirstValue(
com.sun.star.beans.XPropertySet xOptions)
public int getMySecondValue(
                     com.sun.star.beans.XPropertySet        xOptions,
                     int                                    intDummy)
GetMyFirstValue function configuration
- Double click Function1 to expand function settings for the first function:
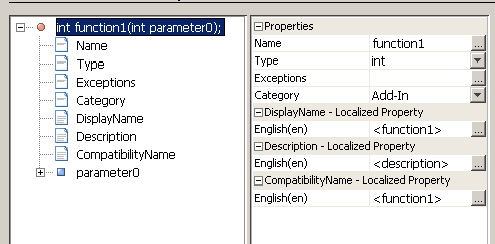
Figure 3, The first function Name and its type
- Set the first Function name as 'getMyFirstValue”
- Set return Type as 'int'
- Set Category as “Add-In'
- Double click parameter0 to configure parameter settings
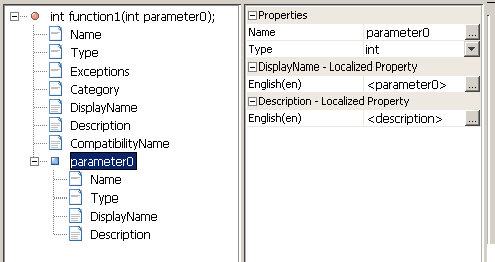
Figure 4, The first function parameter
- Set parameter name as 'xOptions', and set type as 'XpropertySet'
Finaly, the first function will be like the following figure:
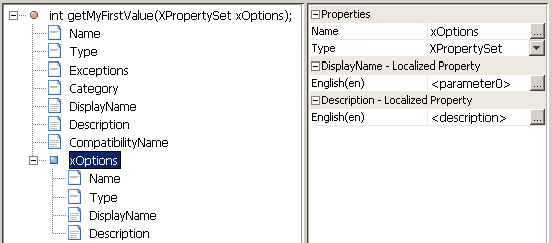
Figure 5, The first function setting
Add the second function – getMySecondValue method
- click 'Add function' button at top right of dialog
- setting function name as 'getMySecondValue'
- click 'Add parameter' to add one more parameter for the second function
- set parameter0's name as ' xOptions', set it's type as 'XpropertySet'
- set parameter1's name as ' intDummy', set it's type as 'int'

Figure 8, Configuration completed
- Click Finish button to finish the wizards.
Now, the Calc Add-In project has been created. From project browser, it will be like the following figure:
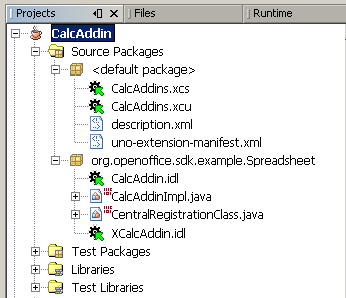
Figure 9, Project Browser
Implement functions
To implement two functions specified previously, open CalcAddinImpl.java file from project browser and find the function bodies.
[java,N]
   // org.openoffice.sdk.example.Spreadsheet.XCalcAddin:
   public int getMyFirstValue(com.sun.star.beans.XPropertySet xOptions)
   {
       // TODO: Exchange the default return implementation for "getMyFirstValue" !!!
       // NOTE: Default initialized polymorphic structs can cause problems
       // because of missing default initialization of primitive types of
       // some C++ compilers or different Any initialization in Java and C++
       // polymorphic structs.
       return 0;
   }
   public int getMySecondValue(com.sun.star.beans.XPropertySet xOptions, int intDummy)
   {
       // TODO: Exchange the default return implementation for "getMySecondValue" !!!
       // NOTE: Default initialized polymorphic structs can cause problems
       // because of missing default initialization of primitive types of
       // some C++ compilers or different Any initialization in Java and C++
       // polymorphic structs.
       return 0;
   }
Figure 10. Original code
Modify a few lines of these two functions:
[java,N]
   // org.openoffice.sdk.example.Spreadsheet.XCalcAddin:
   public int getMyFirstValue(com.sun.star.beans.XPropertySet xOptions)
   {
       // TODO: Exchange the default return implementation for "getMyFirstValue" !!!
       // NOTE: Default initialized polymorphic structs can cause problems
       // because of missing default initialization of primitive types of
       // some C++ compilers or different Any initialization in Java and C++
       // polymorphic structs.
       return (int) 1;
   }
   public int getMySecondValue(com.sun.star.beans.XPropertySet xOptions, int intDummy)
   {
       // TODO: Exchange the default return implementation for "getMySecondValue" !!!
       // NOTE: Default initialized polymorphic structs can cause problems
       // because of missing default initialization of primitive types of
       // some C++ compilers or different Any initialization in Java and C++
       // polymorphic structs.
       return ( (int) 2 + intDummy);
   }
Figure 11, Completed implementation
you may get error message on line 13 like 'cannot find symbol', ignore it. After the first build, the message will not not shown any more.
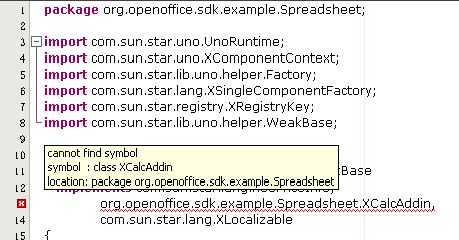
Figure 12, Error message for XCalcAddin
Deploy and test CalcAddin
Deployement
Save all changes and 'clear and build' the project, then the addin can be deployed via right click the 'CalcAddin' in the project browser.
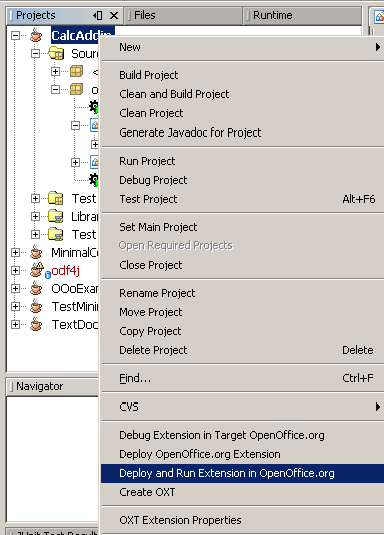
Figure 13, Delpoy the Addin
Extension manager dialog, the new addin is available to use now:
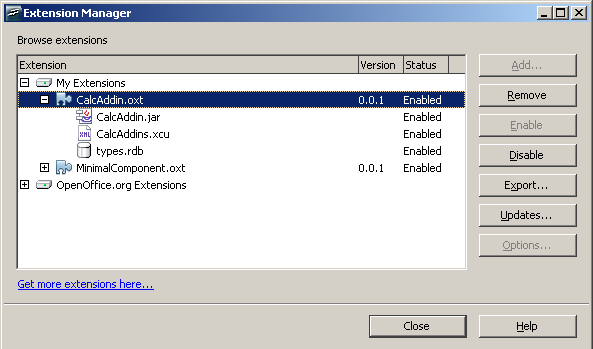
Figure 14, Extension manager
In the function wizard (Ctrl+F2), these two function could be found in the 'Addin'
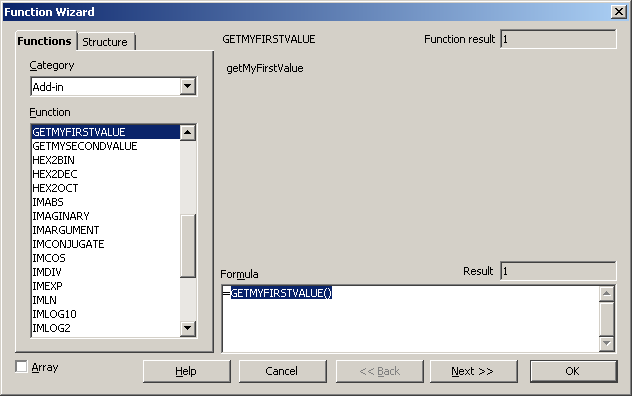
Figure 15, Function Wizard
Testing
Go to the example folder'/CalcAddin/test/' to open the 'CalcAddins.ods' file to test these two functions.
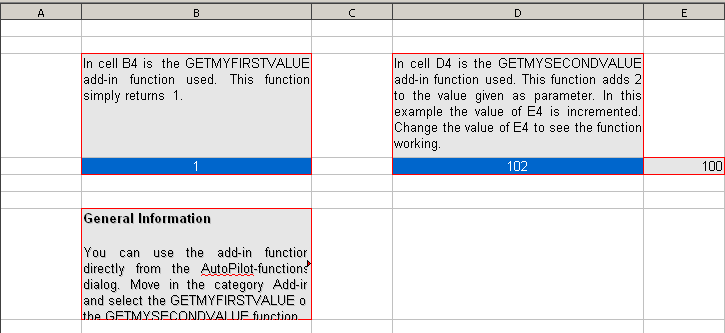
Figure 16, Test Addins

