Difference between revisions of "Documentation/OOoAuthors User Manual/Impress Guide/Formatting connectors"
m |
|||
| Line 2: | Line 2: | ||
{{Documentation/ImpressFormattingTOC | {{Documentation/ImpressFormattingTOC | ||
|ShowPrevNext=block | |ShowPrevNext=block | ||
| − | | | + | |NextPage=Documentation/OOoAuthors User Manual/Impress Guide/Inserting Spreadsheets, Charts, and Other Objects |
|PrevPage=Documentation/OOoAuthors User Manual/Impress Guide/Formatting text2 | |PrevPage=Documentation/OOoAuthors User Manual/Impress Guide/Formatting text2 | ||
}}__NOTOC__ | }}__NOTOC__ | ||
Latest revision as of 05:22, 14 January 2009
Connectors are lines that join two shapes. Connectors stem from a glue point of the shape. Refer to Chapter 5 (Creating Graphic Objects) for a description of the usage of connectors.
Connector properties can be accessed and modified in two ways:
- Manual formatting: right-click on the connector line and select Connector in the pop‑up menu.
- Style-based formatting: select one of the available graphics styles or create a new one as discussed in Using graphics styles to format graphics.
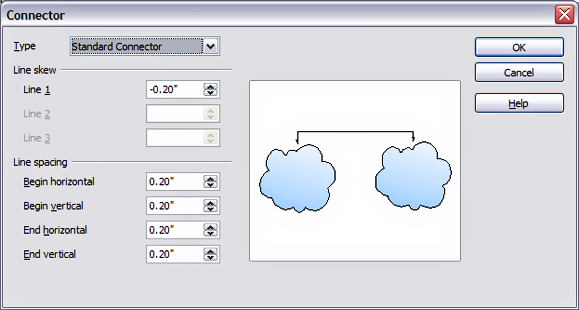
Both methods open the Connector dialog where you can set the style of the connectors. Choose between Standard (the default), Line, Straight, and Curved connector. Whenever multiple connectors overlap, use the Line skew section of the dialog to distance the lines. It is possible to customize the distance between 4 different lines.
In the Line spacing section of the dialog, set the horizontal and vertical space between the connector and the object at each end of the connector.

Setting up the connector properties.
| Content on this page is licensed under the Creative Common Attribution 3.0 license (CC-BY). |