Difference between revisions of "Creating headers and footers"
| Line 1: | Line 1: | ||
| − | + | Headers are portions of a document that always appear at the top of a page; footers appear at the bottom of a page. Typically, headers display the title or chapter name of a document. | |
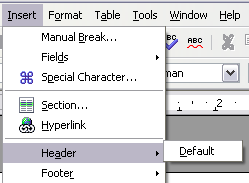
To insert a header, click '''Insert > Header > Default''' (or the page style, if not Default) as shown below. | To insert a header, click '''Insert > Header > Default''' (or the page style, if not Default) as shown below. | ||
| Line 5: | Line 5: | ||
[[Image:HeaderFooter.png|Inserting headers and footers]]<br>Inserting headers and footers. | [[Image:HeaderFooter.png|Inserting headers and footers]]<br>Inserting headers and footers. | ||
| − | + | Similarly, to insert a footer, choose '''Footer'''. | |
| − | + | Depending on which option you choose, an area will appear at the top or bottom of the page where you can enter text. This text will appear at the top or bottom of every page. | |
| − | # | + | Items, such as document titles, chapter titles, and page numbers, which often go into headers and footers, are best added as fields. That way, if something changes, the headers and footers are all updated automatically. |
| + | |||
| + | Here is one common example. To insert the document title into the header: | ||
| + | |||
| + | # Select '''File > Properties > Description,''' enter a title for your document in the ''Title'' area, and click '''OK''' to close the dialog box. | ||
# Add a header ('''Insert > Header > Default'''). | # Add a header ('''Insert > Header > Default'''). | ||
# Place the cursor in the header part of the page. | # Place the cursor in the header part of the page. | ||
| − | # Select '''Insert > Fields > Title'''. | + | # Select '''Insert > Fields > Title'''. The title should appear on a gray background (which does not show when printed and can be turned off). |
| − | # To change the title for the whole document, | + | # To change the title for the whole document, choose '''File > Properties > Description'''. |
Revision as of 06:30, 17 July 2007
Headers are portions of a document that always appear at the top of a page; footers appear at the bottom of a page. Typically, headers display the title or chapter name of a document.
To insert a header, click Insert > Header > Default (or the page style, if not Default) as shown below.

Inserting headers and footers.
Similarly, to insert a footer, choose Footer.
Depending on which option you choose, an area will appear at the top or bottom of the page where you can enter text. This text will appear at the top or bottom of every page.
Items, such as document titles, chapter titles, and page numbers, which often go into headers and footers, are best added as fields. That way, if something changes, the headers and footers are all updated automatically.
Here is one common example. To insert the document title into the header:
- Select File > Properties > Description, enter a title for your document in the Title area, and click OK to close the dialog box.
- Add a header (Insert > Header > Default).
- Place the cursor in the header part of the page.
- Select Insert > Fields > Title. The title should appear on a gray background (which does not show when printed and can be turned off).
- To change the title for the whole document, choose File > Properties > Description.