|
|
| (3 intermediate revisions by the same user not shown) |
| Line 2: |
Line 2: |
| | {{Documentation/GS4MathTOC | | {{Documentation/GS4MathTOC |
| | |ShowPrevNext=block | | |ShowPrevNext=block |
| − | |PrevPage=Documentation/AOO4_User_Guides/Getting Started/Getting Started with Math/Entering a Formula/ Example 2 | + | |PrevPage=Documentation/AOO4_User_Guides/Getting Started/Getting Started with Math/Entering a Formula/Example 2 |
| − | |NextPage=Documentation/AOO4 User Guides/Getting Started/Getting Started with Math/Numbering Equations | + | |NextPage=Documentation/AOO4 User Guides/Getting Started/Getting Started with Math/Formula Layout |
| | }} | | }} |
| | __NOTOC__ | | __NOTOC__ |
| Line 26: |
Line 26: |
| | | | |
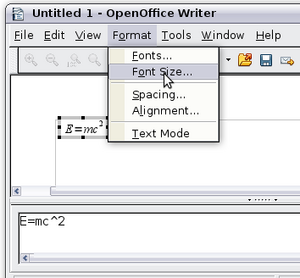
| | # Start the formula editor and choose {{menu|Format|Font size}}. | | # Start the formula editor and choose {{menu|Format|Font size}}. |
| − |
| |
| | [[Image:AOO41GS09_013.png|300px|center]] | | [[Image:AOO41GS09_013.png|300px|center]] |
| | <center>''Figure 214. Changing the font size for a formula''</center> | | <center>''Figure 214. Changing the font size for a formula''</center> |
| | | | |
| − | # Select a larger font size under ''Base size'' (top-most entry).
| + | <ol start="2"> |
| − | | + | <li>Select a larger font size under ''Base size'' (top-most entry).</li> |
| | + | </ol> |
| | [[Image:AOO41GS09_014.png|400px|center]] | | [[Image:AOO41GS09_014.png|400px|center]] |
| | <center>''Figure 215. Edit Base size (top) to make a formula bigger''</center> | | <center>''Figure 215. Edit Base size (top) to make a formula bigger''</center> |
| Line 39: |
Line 39: |
| | [[Image:AOO41GS09_015.png|400px|center]] | | [[Image:AOO41GS09_015.png|400px|center]] |
| | <center>''Figure 216. Result of changing the base font size''</center> | | <center>''Figure 216. Result of changing the base font size''</center> |
| − |
| |
| − | == Formula Layout ==
| |
| − | The most difficult part of using Math comes when writing complicated formulas. This section provides some advice.
| |
| − |
| |
| − | === Brackets Are Your Friends ===
| |
| − | Math knows nothing about order of operation. You must use brackets to state the order of operations explicitly. Consider the following example.
| |
| − |
| |
| − | {| style="border-spacing:0;"
| |
| − | | style="background-color:#e6e6e6;border-top:0.002cm solid #000000;border-bottom:0.002cm solid #000000;border-left:none;border-right:none;padding:0.097cm;"| '''Markup'''
| |
| − | | style="background-color:#e6e6e6;border-top:0.002cm solid #000000;border-bottom:0.002cm solid #000000;border-left:none;border-right:none;padding:0.097cm;"| '''Result'''
| |
| − | |-
| |
| − | | style="background-color:transparent;border-top:none;border-bottom:0.002cm solid #000000;border-left:none;border-right:none;padding:0.097cm;"| 2 over x + 1
| |
| − | | style="background-color:transparent;border-top:none;border-bottom:0.002cm solid #000000;border-left:none;border-right:none;padding:0.097cm;"| <math>\frac{2}{x}+1</math>
| |
| − | |-
| |
| − | | style="background-color:#ffffff;border-top:none;border-bottom:0.002cm solid #000000;border-left:none;border-right:none;padding:0.097cm;"| 2 over {x + 1}
| |
| − | | style="background-color:#ffffff;border-top:none;border-bottom:0.002cm solid #000000;border-left:none;border-right:none;padding:0.097cm;"| <math>\frac{2}{x+1}</math>
| |
| − | |}
| |
| − |
| |
| − | === Equations Over More Than One Line ===
| |
| − | Suppose you want to type an equation covering more than one line. For example:<math>\begin{array}{c}x=3\\
| |
| − |
| |
| − | y=1\end{array}</math>
| |
| − |
| |
| − | Your first reaction would be to simply press the {{key|Enter}} key. However, if you press the {{key|Enter}} key, though the markup goes to a new line, the resulting equation does not. You must type the newline command explicitly. This is illustrated in the table below.
| |
| − |
| |
| − | {| style="border-spacing:0;"
| |
| − | ! Markup
| |
| − | ! Result
| |
| − | |-
| |
| − | | style="background-color:transparent;border-top:none;border-bottom:0.002cm solid #000000;border-left:none;border-right:none;padding:0.097cm;"| x = 3
| |
| − | y = 1
| |
| − | | style="background-color:transparent;border-top:none;border-bottom:0.002cm solid #000000;border-left:none;border-right:none;padding:0.097cm;"| <math>x=3y=1</math>
| |
| − | |-
| |
| − | | style="background-color:#ffffff;border-top:none;border-bottom:0.002cm solid #000000;border-left:none;border-right:none;padding:0.097cm;"| x = 3 newline
| |
| − | y = 1
| |
| − | | style="background-color:#ffffff;border-top:none;border-bottom:0.002cm solid #000000;border-left:none;border-right:none;padding:0.097cm;"| <math>\begin{array}{c}x=3\\
| |
| − |
| |
| − | y=1\end{array}</math>
| |
| − | |}
| |
| − |
| |
| − | === How do I Add Limits to My Sum/Integral? ===
| |
| − | The sum and int commands can (optionally) take the parameters ''from'' and ''to''. These are used for lower and upper limits respectively. These parameters can be used singly or together. Limits for integrals are usually treated as subscripts and superscripts. Remember that subscripts are indicated with _ and superscripts are indicated with ^.
| |
| − |
| |
| − | {| style="border-spacing:0;"
| |
| − | ! Markup
| |
| − | ! Result
| |
| − | |-
| |
| − | | style="background-color:transparent;border-top:none;border-bottom:0.002cm solid #000000;border-left:none;border-right:none;padding:0.097cm;"| sum from k = 1 to n a_k
| |
| − | | style="background-color:transparent;border-top:none;border-bottom:0.002cm solid #000000;border-left:none;border-right:none;padding:0.097cm;"| <math>\sum _{k=1}^{n}{a}_{k}</math>
| |
| − | |-
| |
| − | | style="background-color:#ffffff;border-top:none;border-bottom:0.002cm solid #000000;border-left:none;border-right:none;padding:0.097cm;"| int from 0 to x f(t) dt
| |
| − | or
| |
| − | int_0^x f(t) dt
| |
| − | | style="background-color:#ffffff;border-top:none;border-bottom:0.002cm solid #000000;border-left:none;border-right:none;padding:0.097cm;"| [[Image:AOO41GS09_017.png]]
| |
| − | |-
| |
| − | | style="background-color:transparent;border-top:none;border-bottom:0.002cm solid #000000;border-left:none;border-right:none;padding:0.097cm;"| int from Re f
| |
| − | | style="background-color:transparent;border-top:none;border-bottom:0.002cm solid #000000;border-left:none;border-right:none;padding:0.097cm;"| <math>\underset{\Re }{\int }f</math>
| |
| − | |-
| |
| − | | style="background-color:#ffffff;border-top:none;border-bottom:0.002cm solid #000000;border-left:none;border-right:none;padding:0.097cm;"| sum to infinity 2^{-n}
| |
| − | | style="background-color:#ffffff;border-top:none;border-bottom:0.002cm solid #000000;border-left:none;border-right:none;padding:0.097cm;"| <math>\sum ^{\infty }{2}^{-n}</math>
| |
| − | |}
| |
| − |
| |
| − | {{Note| For more details on integrals and sums, see the ''Math Guide''.}}
| |
| − |
| |
| − | === Brackets with Matrices Look Ugly! ===
| |
| − | For background, we start with an overview of the matrix command.
| |
| − |
| |
| − |
| |
| − | {| style="border-spacing:0;"
| |
| − | ! Markup
| |
| − | ! Result
| |
| − | |-
| |
| − | | style="background-color:#ffffff;border-top:none;border-bottom:0.002cm solid #000000;border-left:none;border-right:none;padding:0.097cm;"| matrix { a # b ## c # d }
| |
| − | | style="background-color:#ffffff;border-top:none;border-bottom:0.002cm solid #000000;border-left:none;border-right:none;padding:0.097cm;"| <math>\begin{array}{cc}a& b\\
| |
| − |
| |
| − | c& d\end{array}</math>
| |
| − | |}
| |
| − |
| |
| − | {{Note| Rows are separated by two #'s and entries within each row are separated by one #.}}
| |
| − |
| |
| − | The first problem people have with matrices is that brackets do not scale with the matrix.
| |
| − |
| |
| − | {| style="border-spacing:0;"
| |
| − | ! Markup
| |
| − | ! Result
| |
| − | |-
| |
| − | | style="background-color:#ffffff;border-top:none;border-bottom:0.002cm solid #000000;border-left:none;border-right:none;padding:0.097cm;"| ( matrix { a # b ## c # d } )
| |
| − | | style="background-color:#ffffff;border-top:none;border-bottom:0.002cm solid #000000;border-left:none;border-right:none;padding:0.097cm;"| <math>\left(\begin{array}{cc}a& b\\
| |
| − |
| |
| − | c& d\end{array}\right)</math>
| |
| − | |}
| |
| − |
| |
| − | Math provides scalable brackets. That is, the brackets grow in size to match the size of their contents. Use the commands ''left (''and ''right)'' to make scalable brackets.
| |
| − |
| |
| − | {| style="border-spacing:0;"
| |
| − | ! Markup
| |
| − | ! Result
| |
| − | |-
| |
| − | | style="background-color:#ffffff;border-top:none;border-bottom:0.002cm solid #000000;border-left:none;border-right:none;padding:0.097cm;"| left( matrix { a # b ## c # d } right)
| |
| − | | style="background-color:#ffffff;border-top:none;border-bottom:0.002cm solid #000000;border-left:none;border-right:none;padding:0.097cm;"| <math>\left(\begin{array}{cc}a& b\\
| |
| − |
| |
| − | c& d\end{array}\right)</math>
| |
| − | |}
| |
| − |
| |
| − | {{Tip| Use ''<nowiki>left[</nowiki> ''and ''right]'' to obtain square brackets.}}
| |
| − |
| |
| − | === How do I Make a Derivative? ===
| |
| − | Making derivatives essentially comes down to one trick: ''Tell Math it's a fraction''.
| |
| − |
| |
| − | In other words, you have to use the ''over'' command. Combine this with either the letter ''d'' (for a total derivative) or the ''partial'' command (for a partial derivative) to achieve the effect of a derivative.
| |
| − |
| |
| − | {{Note| Notice that we have to use braces (squiggly brackets) to make the derivative.}}
| |
| − |
| |
| − | {| style="border-spacing:0;"
| |
| − | ! Markup
| |
| − | ! Result
| |
| − | |-
| |
| − | | style="background-color:transparent;border-top:none;border-bottom:0.002cm solid #000000;border-left:none;border-right:none;padding:0.097cm;"| {df} over {dx}
| |
| − | | style="background-color:transparent;border-top:none;border-bottom:0.002cm solid #000000;border-left:none;border-right:none;padding:0.097cm;"| <math>\frac{\mathit{df}}{\mathit{dx}}</math>
| |
| − | |-
| |
| − | | style="background-color:#ffffff;border-top:none;border-bottom:0.002cm solid #000000;border-left:none;border-right:none;padding:0.097cm;"| {partial f} over {partial y}
| |
| − | | style="background-color:#ffffff;border-top:none;border-bottom:0.002cm solid #000000;border-left:none;border-right:none;padding:0.097cm;"| <math>\frac{\partial f}{\partial y}</math>
| |
| − | |-
| |
| − | | style="background-color:#ffffff;border-top:none;border-bottom:0.002cm solid #000000;border-left:none;border-right:none;padding:0.097cm;"| {partial^2 f} over {partial t^2}
| |
| − | | style="background-color:#ffffff;border-top:none;border-bottom:0.002cm solid #000000;border-left:none;border-right:none;padding:0.097cm;"| <math>\frac{{\partial }^{2}f}{\partial {t}^{2}}</math>
| |
| − | |}
| |
| − |
| |
| − | === How do I Align My Equations at the Equals Sign? ===
| |
| − | Math does not have a command for aligning equations on a particular character, but you can use a matrix to do this, as shown below.
| |
| − |
| |
| − | {| style="border-spacing:0;"
| |
| − | ! Markup
| |
| − | ! Result
| |
| − | |-
| |
| − | | style="background-color:#ffffff;border-top:none;border-bottom:0.002cm solid #000000;border-left:none;border-right:none;padding:0.097cm;"| matrix{
| |
| − | alignr x+y # {}={} # alignl 2 ##
| |
| − | alignr x <nowiki># {}={} # alignl 2-y</nowiki>
| |
| − | }
| |
| − | | style="background-color:#ffffff;border-top:none;border-bottom:0.002cm solid #000000;border-left:none;border-right:none;padding:0.097cm;"|[[Image:AOO41GS09_018.png]]
| |
| − | |}
| |
| − |
| |
| − | The empty braces around = are necessary because = is a binary operator and thus needs an expression on each side.
| |
| − |
| |
| − | You can reduce the spacing around = if you change the inter-column spacing of the matrix:
| |
| − |
| |
| − | # With the equation editor open, choose {{menu|Format|Spacing}} from the menu bar.
| |
| − | # In the Spacing dialog (Figure 217), click the '''Category''' button and select '''Matrices''' in the drop-down menu.
| |
| − | # Enter '''0%''' for Column spacing and click {{button|OK}}.
| |
| − |
| |
| − | [[Image:AOO41GS09_016.png|400px|center]]
| |
| − | <center>''Figure 217: Changing spacing in a matrix formula''</center>
| |
| | | | |
| | {{CCBY}} | | {{CCBY}} |
| | [[Category:Getting Started (Documentation)]] | | [[Category:Getting Started (Documentation)]] |
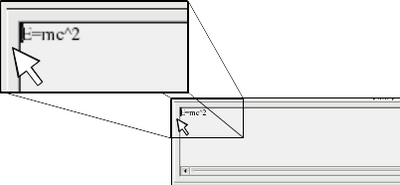
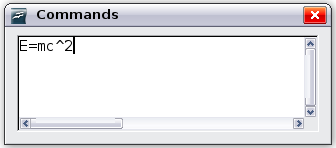
The formula editor can cover a large part of the Writer window. To turn the formula editor into a floating window, do this:
Figure 213 shows the result. You can dock the floating window again by using the same steps. Hold down the Ctrl key and double-click the window frame.
This is one of the most common questions people ask about Math. The answer is simple, but not intuitive:
The result of this change is illustrated in Figure 216.


