Creating a bibliography
- Creating a table of contents
- Creating an alphabetic index
- Creating and using other types of indexes
- Creating a bibliography
| [[{{{PrevPage}}}|< Previous Page
]] |
[[{{{NextPage}}}|Next Page
>]] |
A bibliography is useful for displaying references used throughout a document. These references are either stored in a bibliographic database or within the document itself.
This section shows you how to:
- Create, add, and maintain entries within a bibliographic database
- Add a reference into a document
- Format the bibliography
- Update and edit an existing bibliography
For most of this section, the database table used is the sample one that comes with Writer. For information on creating a new table in the bibliographic database, see Chapter 10 (Getting Started with Base) in the Getting Started book.
Creating a bibliographic database
Although you can create references within the document itself, creating a bibliographic database allows reuse in other documents and saves a lot of time.
Follow these steps to create a bibliographic database:
- Select Tools > Bibliography Database. A window similar to that below is shown.
- You can use the top portion of this window to:
- Filter for specific records within the database (see Filtering records).
- Change some details of columns in the database (see Changing column details).
- Select an alternative data source (another database or table) or change details of the fields in the database.
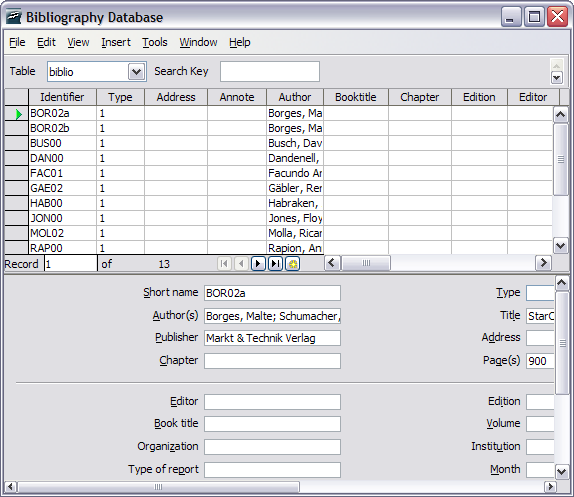
Bibliography Database main window.
The middle portion of the window shows each of the records in a table layout similar to that of a spreadsheet. Additional fields can be viewed by scrolling the table to the right.
The bottom portion of the window shows the contents of the selected record.
Filtering records
To set up a filter for specific records within the bibliographic database, select Tools > Filter from the Bibliographic Database menu bar. On the Standard Filter dialog box, choose the fields, conditions and values for the filter and click OK.

Setting up a filter for the bibliographic database.
Changing column details
To change the details of columns in the bibliographic database, select the Column Arrangement button near the top of the window. The Column Layout for Table biblio dialog box is displayed.
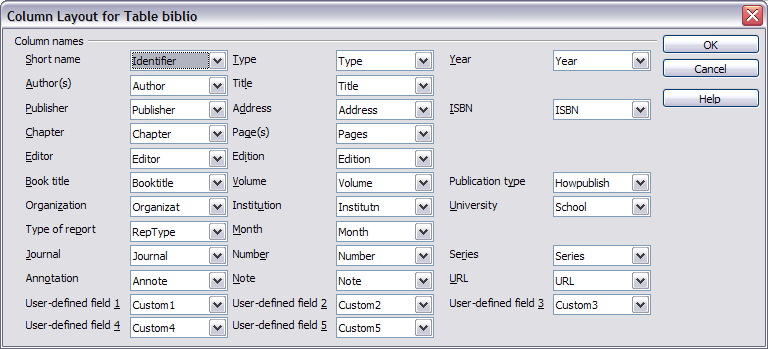
Changing column layout for bibliographic database.
Changing field details
You can make changes to the bibliography database (for example, rename fields or change the length of fields) by doing the following:
- In the main document (not the Bibliography Database screen), press F4 or click View > Data Sources to open the data source window, similar to the figure below.
- Make sure that the Bibliography database is selected as well as the correct table. You may have to expand some levels to be able to select the correct ones.
- Right-click on the table entry (biblio in the example) and select Edit Database File from the pop-up menu. This opens a window similar to the one below, which is the main menu for Base, the database component of OpenOffice.org.
- If Tables (under the Database view) is not selected, select it now.
- Right-click on the biblio table name in the Tables section and select Edit from the context menu to display a window similar to that shown below.
- You can now select each of the rows and modify the Field Properties as required.
- When finished, you will be asked to confirm that you want the changes saved.
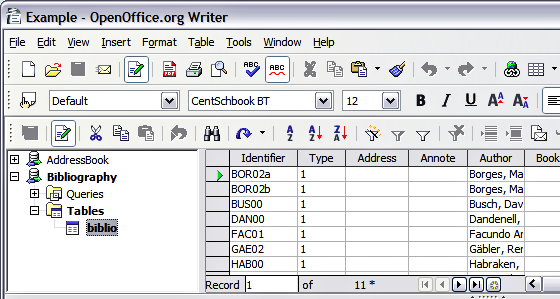
Data Source view of Bibliography database.
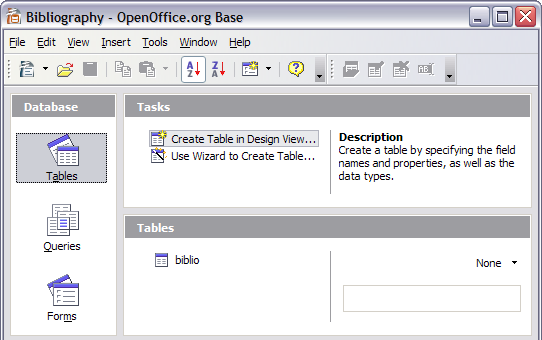
Main window for working with databases.
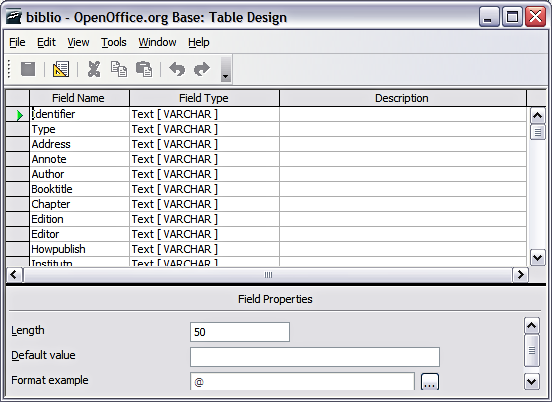
Modify table properties window.
| For more information on how to use OOo’s database features, see Chapter 10 (Getting Started with Base) in the Getting Started book. |
Adding entries to the database
To add entries to the database:
- You can add records directly into the database using the lower portion of the window shown in Creating a bibliographic database.
- Complete each of the fields as required. Use the Tab key to move between fields.
- It is best to use a unique name in the Short name field. This is used when inserting entries into documents.
- To complete the entry move to the last field and press Tab once more.
| The Identifier column in the upper portion of the Bibliography Database window is labeled Short name in the lower portion of the window. |
If your document requires [Author, date] style citations, use the Identifier (Short name) field of the database to record the information in the required format. If you are using a simple citation numbering system (e.g., [1],[2],...), use a unique reference of some sort in the Identifier (Short name) field. Writer will auto-number entries based on the position within the document.
Maintaining entries in the database
To maintain entries in the database, use the Bibliography Database window as in the previous section. Click on the appropriate field and modify the text as appropriate.
Modified entries will be saved automatically to the database when the cursor moves off the record.
Adding a reference (citation) into a document
Writer supports two ways of showing references (citations) in the text of a document:
- Using authors’ names and dates of the referenced documents, for example [Smith, 2004], as recorded in the Identifier (Short name) of each bibliographic entry.
- By numbering the referenced documents in the sequence they occur in the text, for example [1].
| To specify which citation style is used in the document, use the Index/Table page on the Insert Index/Table dialog. |
To add references from the bibliographic database into a document:
- Place the cursor where you want the reference to appear.
- From the main menu, choose Insert > Indexes and tables > Bibliographic entry.
- In the Insert Bibliographic Entry dialog box, shown below, choose From bibliography database at the top of the dialog box. (You can also insert a reference from the document itself by selecting From document content, but that method is not covered in this chapter.)
- Select the reference from the Short name dropdown list near the bottom of the dialog box. The Author and Title of the selected reference are shown in the middle of the dialog box, to help you verify that it is the reference you want.
- To insert the reference into the document, click Insert.
- You can keep the dialog box open and insert another reference into the document; you do not need to close and reopen it.
- When you have finished inserting all the references, select Close.
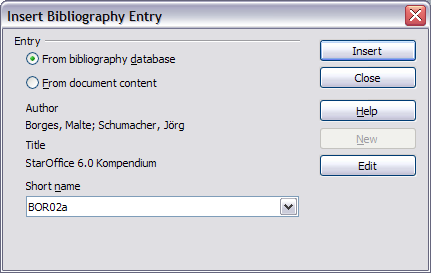
Inserting bibliographic entries into a document.
Formatting the bibliography
Formatting the bibliography involves choices made in two places:
- Insert Index/table dialog (covered in this section)
- Bibliography 1 paragraph style (see Defining the paragraph style for the bibliography)
To create the bibliography:
- Place the cursor at the point where you wish to insert the bibliography.
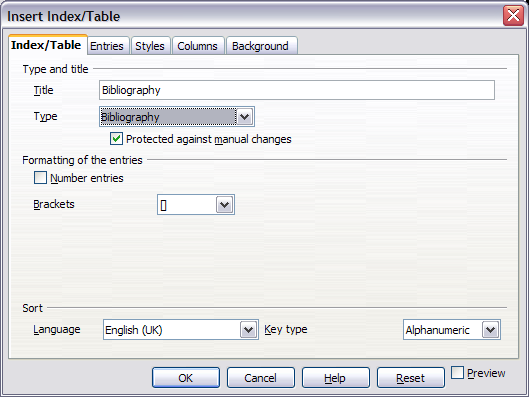
- Select Insert > Indexes and tables > Indexes and tables and change the Type to Bibliography, to see a dialog box similar to that shown below.
The Insert Index/Table dialog box has five pages.
Using the Index/Table page
The basic settings are selected on this page.
- To give the bibliography a title, enter it in the Title field. (A title is not required.)
- You can protect the bibliography from being changed accidentally, by checking the Protected against manual changes checkbox. If this box is checked, the bibliography can only be changed using the context menu or the Insert Table/Index dialog. If the box is not checked, the bibliography can be changed directly on the document page, just like other text.
- To have the bibliographic entries numbered within the body of the document (for example, [1], [2], ...), select Number entries. If, however, you wish to have the field Identifier (from the database) appear in the document, clear this checkbox.
- Select the type of brackets that you want for the referenced entries shown within the body of the document.
- Define the sorting you require. Currently only alphanumeric sorting is supported. Sorting by the the sequence that entries appear in the text is done on the Entries tab.
Using the Entries page
The structure of this page is similar to that of the previous sections.
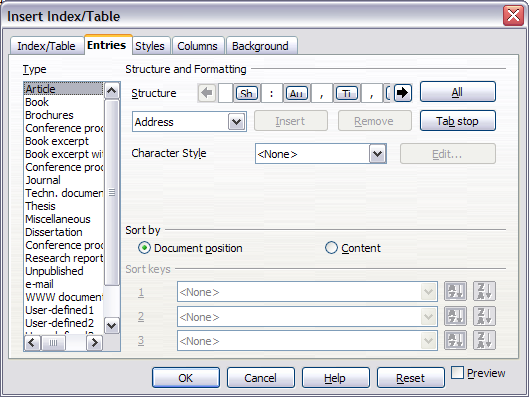
Entries page for bibliographies.
You can define how the entry will appear based on the Type of the entry, or simply apply the same format to all entries by selecting the All button.
The Structure of the entry is based on the fields available in the bibliographic database. The ones shown by default are:
- Au – Author
- Ti – Title
- Ye - Year
To determine how entries are sorted, modify the Sort by options. To sort by the sequence that entries appear in the text, choose Document position. To sort alphanumerically, choose Content. Use Sort keys to group similar references.
Using the Styles, Columns and Background pages
Refer to Using the Styles page, Using the Columns page, and Using the Background page.
Generating the bibliography
To generate the bibliography so that it appears in your document, click OK. The Insert Index/Table dialog box closes and the bibliography appears in your document.
Defining the paragraph style for the bibliography
You can modify the Bibliography 1 paragraph style to suit your requirements. For example, to number the entries in the bibliography list, you need to define a numbering style and link that numbering style to the Bibliography 1 paragraph style. To do this:
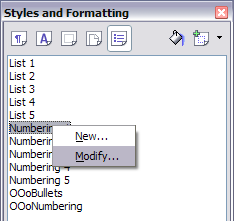
- On the Styles and Formatting window, click on the List Styles icon. You can either define a new list style or modify one of those supplied. In this example, we will modify the Numbering 1 style. Right-click on Numbering 1 and choose Modify from the pop-up menu.
- On the Numbering Style dialog, go to the Options page. In our example we want to have the numbers enclosed in square brackets. To do this, type [ in the Before box and ] in the After box, as shown below.
- Now go to the Position tab of the Numbering style dialog. In the Spacing to text box, specify how much indentation you want for the second and following lines of any item in the bibliography list of your document. Often you will need to experiment a bit to see what is the best setting. In our example, we have chosen 0.20 inch.
- Click OK to save these settings and close the Numbering Style dialog. Return to the Styles and Formatting window, click on the Paragraph Styles icon, choose All Styles from the list at the bottom of that window, then right-click on Bibliography 1 and choose Modify.
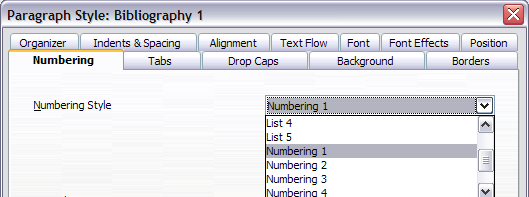
- On the Paragraph Style dialog, go to the Numbering tab and select Numbering 1 from the drop-down list. (See below.) Click OK to save this change to the Bibliography 1 paragraph style.
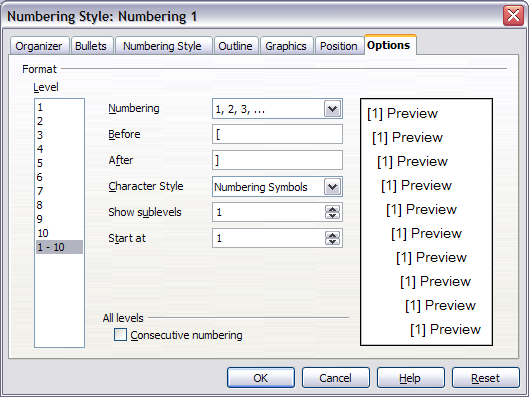
Specifying square brackets before and after the number in a list.
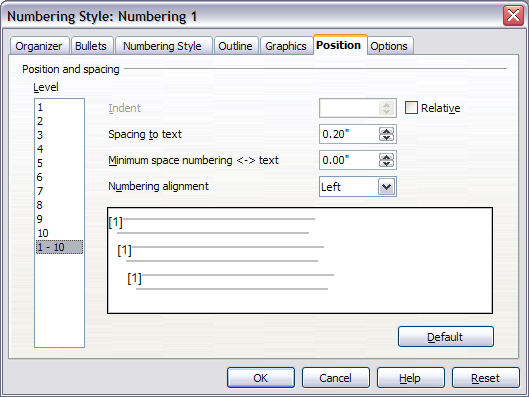
Setting the spacing between the margin and the text.
Now when you generate the bibliography, the list will look something like the one shown below.

Result of settings for Bibliography 1 paragraph style.
Updating and editing an existing bibliography
To modify the display of bibliography entries:
- Click anywhere in the bibliography and then right-click.
- From the pop-up menu, choose Edit Index/Table. The Insert Index/Table dialog box opens and you can edit and save the table using the five pages described in the previous section.
To update or delete the bibliography, follow the same process as described in the sections Updating a table of contents and Deleting a table of contents.
| Content on this page is licensed under the Creative Common Attribution 3.0 license (CC-BY). |
